Friday, September 16, 2011

Flatbread

I've been making this flatbread for a few years now and it is always a huge hit in my house.  It isn't a quick throw together bread though as you do have to start it about 4 or so hours before you actually want to eat it.  I love making this flatbread to dip into things like when I make something with extra sauce like Beef Vindaloo (recipe coming soon!).  The original recipe is a Bobby Flay recipe though I can't remember exactly where I saw him make it but I'm pretty sure at some point on Food Network as that is where I usually see everything.   This bread really is awesome and worth trying.


Flatbread

1 1/2 cups warm water (105 to 110 degrees F)
1/2 teaspoon active dry yeast
3 ½ cups all-purpose flour
2 teaspoon salt
½ tsp. sugar
2 tablespoons olive oil, plus more for bowl

Mix water and yeast in a large bowl and let stand 5 minutes to proof. Gradually pour in 2 cups of the flour and stir to incorporate. Mix for about 1 minute to form a sponge. Let stand, covered, for at least 1 hour.

Put sponge in the bowl of a stand mixer. Using the dough hook, add the salt and oil, then add the flour, 1/2 cup at a time, to form a dough. Remove from bowl and knead. Place in a clean oiled bowl and let rise, slowly, about 2 1/2 hours. Divide dough into 6-8 balls (depending on how big you want them).  Let rise again for 1/2 hour, and then roll out.  Heat skillet medium heat and add tbsp. butter and add one flatbread at a time browning on both sides (for about 45 seconds a side depending on heat), then repeat with adding more butter then browning flatbread.

Thursday, September 15, 2011

Cinnamon Sugar Pull Apart Bread

I made a cinnamon bread recently that was really good and it made me want more.  I love cinnamon.  So of course, I upted the amount of cinnamon.  This bread was really really good.  It was like a giant cinnamon roll that you just unrolled and pulled apart.  Next time, oh yea there will be a next time, I'm going to make a cream cheese glaze to drizzle over the top.  We actually all went out to lunch while this bread was sitting at home rising and I made it as soon as we got back.  Being that we were all full I didn't expect much to get eaten but between the 4 of us we ate the entire loaf in one sitting!  Absolutely amazing bread!  Like many amazing recipes I've made before I found this one at Chef in Training. 


Cinnamon Sugar Pull Apart Bread

For the Dough:
2 3/4 cups plus 2 tablespoons all-purpose flour
1/4 cup granulated sugar
2 1/4 teaspoons (1 envelope) active dry yeast
1/2 teaspoon salt
2 ounces unsalted butter
1/3 cup whole milk
1/4 cup warm water (110-115 degrees)
2 large eggs, at room temperature
1 teaspoon pure vanilla extract

For the Filling:
1 cup granulated sugar
1 tbsp. ground cinnamon
2 ounces unsalted butter, melted

In the bowl of a your standing mixer add your water, yeast and 1 tsp. of your sugar a large mixing bowl.  In a separate bowl whisk together 2 cups flour, sugar and salt and then set aside.
In a small saucepan, melt together milk and butter until butter has just melted.  Remove from the heat and add in vanilla extract.  Let mixture stand for a minute or two, or until the mixture is warm, about 110 degrees. 

Pour the flour into the mixer, fitted with a paddle, and start to incorporate the flour into the yeast mixture.  Pour in milk and butter mixture, then add eggs one at a time until fully incorporated.  The mixture will be very sticky.

Place the dough is a large,  greased bowl.  Cover with plastic wrap and a clean kitchen towel.  Place in a warm space and allow to rest until doubled in size, about 1 hour. 

While the dough rises, whisk together the sugar and cinnamon for the filling.  Set aside.  Melt 2 ounces of butter.  Set aside.  Grease and flour a 9×5x3-inch  loaf pan with butter.  Set that aside too.


Punch down the risen dough and pour onto a floured work surface.  Knead about 2 tbsp. or so of flour into the dough.  Simply sprinkle on work surface and over the top.  Until you have a smooth ball of dough, like the picture above.  Allow to rest for 5 minutes.  On a lightly floured work surface, use a rolling pin to roll the dough out.  The dough should be roughly 12x20.  I don't really use a measuring stick or anything I just roll it out nice and big. So try to roll it as large as the dough will go.  Use a pastry brush to spread melted butter across all of the dough.  Sprinkle with ALL of the sugar and cinnamon mixture. 

Next, it is time to slice the dough vertically, into six equal-sized strips. See picture to the right. Stack the strips on top of one another and slice the stack into six equal slices once again, see other picture to the right.  You’ll have six stacks of six squares.

Layer the dough squares in the loaf pan like a flip-book, like picture below.  Place a kitchen towel over the loaf pan and allow in a warm place for 1 hour or until almost doubled in size.

Place a rack in the center of the oven and preheat to 350 degrees F.  Place loaf in the oven and bake for 20 minutes.  Then cover with aluminum foil and bake another 8 minutes or until brown and cooked through. That way the top won't brown too much while finishing cooking.

Remove from the oven and allow to rest for 20 to 30 minutes.   Run a butter knife around the edges of the pan to loosen the bread and invert onto  a clean board.  Place a cake stand or cake plate on top of the  upside down loaf, and carefully invert so it’s right side up.


Post shared with:

Sweet as Sugar Cookies


Tuesday, September 13, 2011

Whisking Wednesdays #17

Photobucket

Welcome to Whisking Wednesdays! 


Ahh another week gone.  Where does the time go?  We've had tons of fun in the kitchen lately making cookies and homemade pasta.  My kids both love helping me.  My 1 year old's new word is "dough".  He comes into the kitchen and when I pick him up he sees dough on the counter and points and gets so exciting saying "dough, dough".  He loves to get his hands and my kitchen dirty!  Hope you all had a wonderful week as well.


Thank you all who participated in this week's Whisking Wednesdays and hope to see you back again this week!


Not only does this pie look beautiful I love cherries, love, love, love em'.  I have never had a chocolate cherry combination (nope never had a chocolate covered cherry!) before and this just really looks so pretty and I love dark chocolate in anything.  Milk chocolate is good but dark chocolate is awesome.  You can tell the crust is homemade and it just makes it so homey. I love making pie crust. 


#1
Traveling Spoon
Cherry Almond & Dark Chocolate Pie


Like I've said a million times, I LOVE cinnamon!  Everyone loves cinnamon rolls and the flavors that go with it.  Plus the presentation really is cute.


#2
Sugarbeams and other Half Baked Adventures 
Cinnamon Roll Cupcakes 


Banana bread is just such an American classic.  The smell of banana bread baking just fills the house and puts a smile on everyone's face.  I too use yogurt in mine and it makes such a moist delicious bread.  This one looks so good.  Makes me want to tell the kids to stop eating all the bananas and let me make some.  I love banana bread the day after for breakfast with my coffee.  Ahhh, the simple pleasures of life!


Photobucket

Photobucket


The Rules:
  1. Please link up to the URL of your post, not the URL of your main blog. When it asks for "Name", type in the name of your recipe.
  2. Please leave a link back to this post in your post or Grab My Button.
  3. Share your delicious recipes from this week. You are welcome to link up multiple recipes.
  4. Leave me a comment and let me know that you've linked up.
  5. Please visit at least two others and comment on the goodies they've added to this party.
  6. Also, I would love for you to follow me but it isn't a requirement.  
This weeks theme is going to be just your favorite recipe you've made from the week.  Whether it is a dessert, breakfast, dinner or snack.  


Fudgy Peanut Butter Brownie Bars


So like these brownies weren't the most amazing, fudgy, rich, decadent things ever, Anne Thornton had to make them even more off the charts by adding a peanut butter buttercream and a chocolate ganache topping!  This peanut butter buttercream is probably one of the most amazing things on Earth!  I could eat it all day and night for the rest of my life.  I honestly had trouble spreading it over the brownies because I just wanted to eat it with a spoon.  I want to just add it to or in or on everything now.  This was probably one of the richest desserts I've ever made.  Granted, I should have used a bigger pan so my bars weren't so thick but I didn't and they were pretty huge and quite heavy.  I also didn't use the peanuts that were called for in the recipe as my household isn't big on nuts in anything so I opted to not use them.  Anne Thornton has done it again with another absolutely amazing recipe that you just must try!  These brownies are amazing but the buttercream is to die for!


Fudge Brownies

1 1/4 sticks unsalted butter, plus more, softened, for pan
1 cup unsweetened natural cocoa powder
1/2 teaspoon salt
1 1/3 cups sugar
1 1/4 teaspoon pure vanilla extract
2 eggs, at room temperature
2/3 cup all-purpose flour
My daughter desperately waiting for the "go ahead".
1 1/2 cups bittersweet chocolate chips 

Preheat oven to 350 degrees.  Melt butter in a saucepan on medium-low heat.  Once melted add in the cocoa, sugar and salt and stir until the sugar has dissolved completely.  It should start to look a bit like the start of fudge.  Turn off heat and allow to cool a bit.  Add in vanilla and eggs and whisk until combined.  Pour flour into the chocolate mixture and whisk until just combined.  Add in the chocolate chips. Grease a pan, 9x13 or to make it easier to get the brownies out line with parchment paper or aluminum foil and then grease that.  Bake 20-25 minutes or until edges are done, the center will still look a bit underdone.  If you want to cook it more that is fine, I like mine still a bit gooey.  Then cool completely.  I prefer to refrigerate mine until completely set.  Slice and serve.  YUM! 


Peanut Butter Buttercream Layer:

1 cup creamy peanut butter (don't use old-fashioned or natural)
1/2 stick unsalted butter, at room temperature
1 cup powdered sugar

1/4 teaspoon salt
1 1/4 tablespoons milk
1 teaspoon pure vanilla extract 

While the brownies are cooling make the buttercream.  For the buttercream: Mix your peanut butter and butter together in a stand mixer until they are totally blended. Turn your mixer down and slowly add your powdered sugar and fine sea salt. Stop the mixer and scrape the sides and bottom of the bowl. Turn your mixer back to medium, add your milk and vanilla and keep mixing until it's fully blended.  Dollop the peanut butter buttercream in heaping spoonfuls on top of the cooled brownies. Evenly spread it with the back of a butter knife the over the surface. 


Ganache:

2 cups semisweet chocolate chips
7 tablespoons unsalted butter

    For the ganache:  Melt the chocolate chips and butter together in a small saucepan over low heat, stirring constantly. Allow the ganache to cool down slightly for 10 minutes or so, then pour it evenly over the peanut butter buttercream layer. Smooth the ganache out with the back of a butter knife, making sure to cover the buttercream completely. Chill the brownies in the refrigerator until the toppings are set, 1 1/2 hours or so. 

    Post shared with:
    Sweet as Sugar Cookies

    Sunday, September 11, 2011

    Fudgy Brownies

    I love brownies.  I think they are my husband's favorite chocolate dessert, especially if I add chocolate chips into them.  I have a great brownie recipe I use all the time.  However, watching Dessert First with Anne Thornton recently she shared her brownie recipe and I have to tell you, WOW!  These are the most fudgy decadent brownies I've ever had.  It is almost like eating fudge but in a brownie.  They are so rich that I honestly only could eat one, and usually I never stop at just one brownie.  I really really enjoyed these and definitely will be making this again and again.  I think they may have been a tad too rich for my husband but I personally think the richer the better.  Warm from the oven they reminded me of a warm gooey molten lava cake but a bit thicker.  Definitely worth trying!


     Fudge Brownies

    1 1/4 sticks unsalted butter, plus more, softened, for pan
    1 cup unsweetened natural cocoa powder
    1/2 teaspoon salt
    1 1/3 cups sugar
    1 1/4 teaspoon pure vanilla extract
    2 eggs, at room temperature
    2/3 cup all-purpose flour
    1 1/2 cups bittersweet chocolate chips 

    Preheat oven to 350 degrees.  Melt butter in a saucepan on medium-low heat.  Once melted add in the cocoa, sugar and salt and stir until the sugar has dissolved completely.  It should start to look a bit like the start of fudge.  Turn off heat and allow to cool a bit.  Add in vanilla and eggs and whisk until combined.  Pour flour into the chocolate mixture and whisk until just combined.  Add in the chocolate chips. Grease a pan, roughly 5x5ish or to make it easier to get the brownies out line with parchment paper or aluminum foil and then grease that.  Bake 20-25 minutes or until edges are done, the center will still look a bit underdone.  If you want to cook it more that is fine, I like mine still a bit gooey.  Then cool completely.  I prefer to refrigerate mine until completely set.  Slice and serve.  YUM! 


      Homemade Ravioli

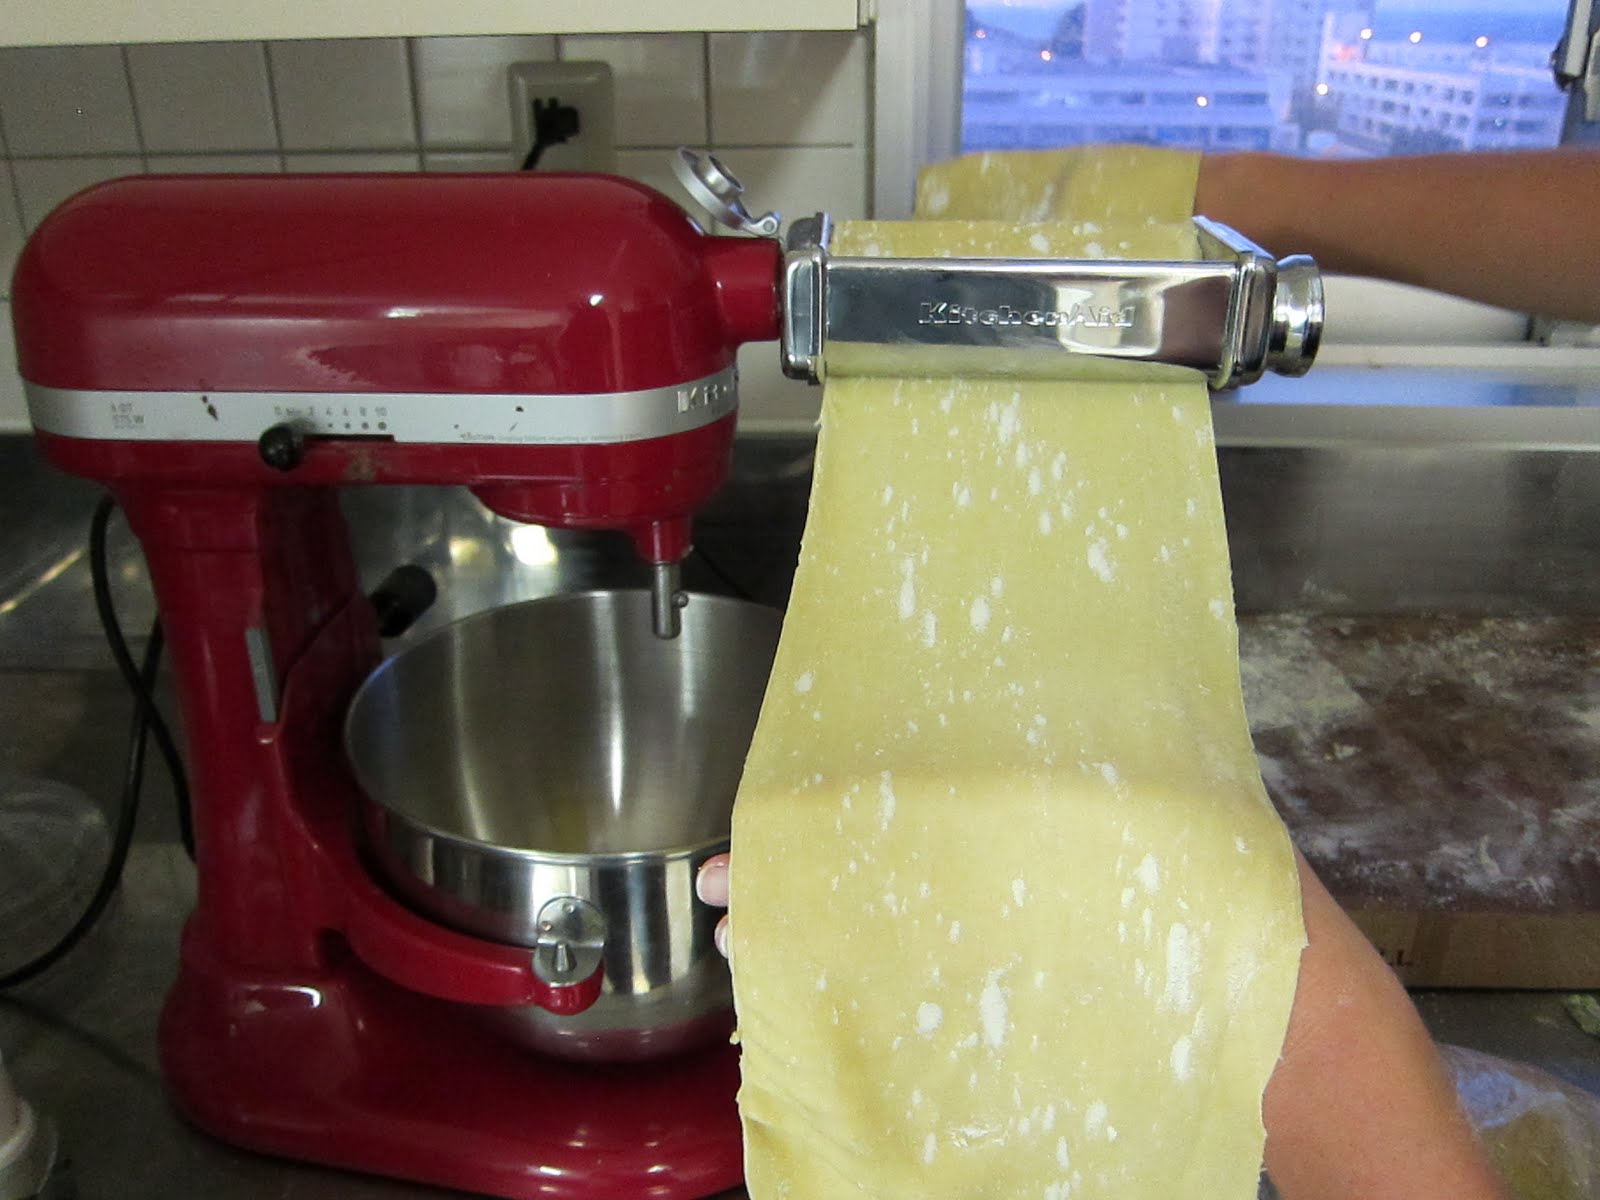
      It has been quite some time since I've used my pasta attachment to my mixer.  Probably because making homemade pasta takes a bit of time and when you have small children it isn't easily to find that extra bit of time.  So I had actually decided to  just reheat leftovers for dinner last night and was enjoying a few minutes of down time watching Secrets of a Restaurant Chef on Food Network.  LOVE that show, by the way.  Anne Burell was making homemade ravioli and I just got the itch.  As she was throwing ingredients into her pasta dough on TV I was in the kitchen doing the same.  Granted I don't see Ann Burell doing this with a 1 year old and a 4 year old in the kitchen wanting to be a part of every step.  Once I finished the dough I had to run to the grocery store to buy stuff for the filling since I hadn't anticipated making anything I had not one single ingredient I needed on hand.  By the time my husband woke up (he sleeps during the day sometimes because he works nights) I was in the kitchen with my 1 year old on my hip trying to put the dough through the pasta machine and make my ravioli.  The pasta turned out amazing.  It was really pretty simple to throw together, especially the finishing sauce.  I think now that my kids are out of the tiny baby phase I might be able to start making homemade pasta a bit more often!  This freezes really well too, so I made about half that night and froze the other half for another time.  
      My flour well.

      Homemade Pasta:

      4 c. all-purpose flour
      4 whole eggs + 1 egg yolk
      1/4 c. extra virgin olive oil
      2 tbsp. water
      1 1/2 tsp. salt

      So the first thing you need to do is dump your flour onto your work surface and create a huge well in the center.  Then you can add all your ingredients into the center of that well.  If your well is too small you'll just end up with a bigger mess so you really want to make it BIG.   The picture to the right is of what your well with all your ingredients in should look like.  Use a fork (or your fingers) and pop your yolks and slowly start to incorporate the flour into the egg mixture in the middle.  You can use a circular motion going around the edges of the flour until you have a rough dough.  Then get your hands in there.  Start kneading the dough together to get all bits and pieces incorporated.  If the dough is too dry you can add a tbsp. more or two of water.  At this point you'll start kneading the dough.  This is a long process with pasta.  You start out thinking wow this will never come together it looks all wrong but you have to give it time.  Knead your dough for about 10-15 full minutes.  It should be smooth and silky at this point.  Put your whole body weight into.  You now need to let your dough rest for about 1 hour.  This is the perfect time to start getting your ravioli filling together.  

      Dough after 10 minutes of kneading.

      Ravioli Filing:

      2 c. whole milk ricotta
      3/4 c. Parmesan cheese, fresh grated
      2 eggs
      Salt, to taste
      1 1/2 c. cooked spinach

      I actually don't usually have fresh spinach available at my store so I have no choice but to make do with frozen.  I just dumped a bag of frozen spinach into boiling (salted) water for 1-2 minutes then pulled it out and allowed it to cool.  Make sure to squeeze out all excess water.  Then toss it into the food processor and turn it on for about 30-45 seconds to allow it to chop almost puree the spinach.  Add the ricotta, spinach and Parmesan cheese to a bowl.  I like to add the salt and taste it before adding in the egg because you don't want a bland filling.  Now whisk in your eggs.  Pour the entire filling into a large ziplock bag that you can use as a disposable pastry bag.  Cut the corner off so you can easily squeeze the filling out onto the pasta sheets when the time comes.
      Rollin' out the pasta.

      Adding in the filling.
      Now back to your pasta. It is time to roll out the dough.  I cut my pasta into 4 separate pieces.  Make sure the ones you aren't working with stay covered.   Cut off about 1/4 of the dough and flour it and flatten it a bit.  Attach your pasta roller to your mixer or get out your hand roller.  start feeding the dough in nice and slowly with it on setting 1.  The first 2 times fold it in half and roll it back through on setting 1.  After the third time, adjust your setting to 2.  Each time go up to the next smaller setting until you get to setting 6.  You can stop at 6.  You might want to run it through an extra time on any one of the settings but you don't have to, that is up to you. Make sure to flour your pasta if it seems sticky, you don't want it to stick or it'll start ripping or sticking to itself.

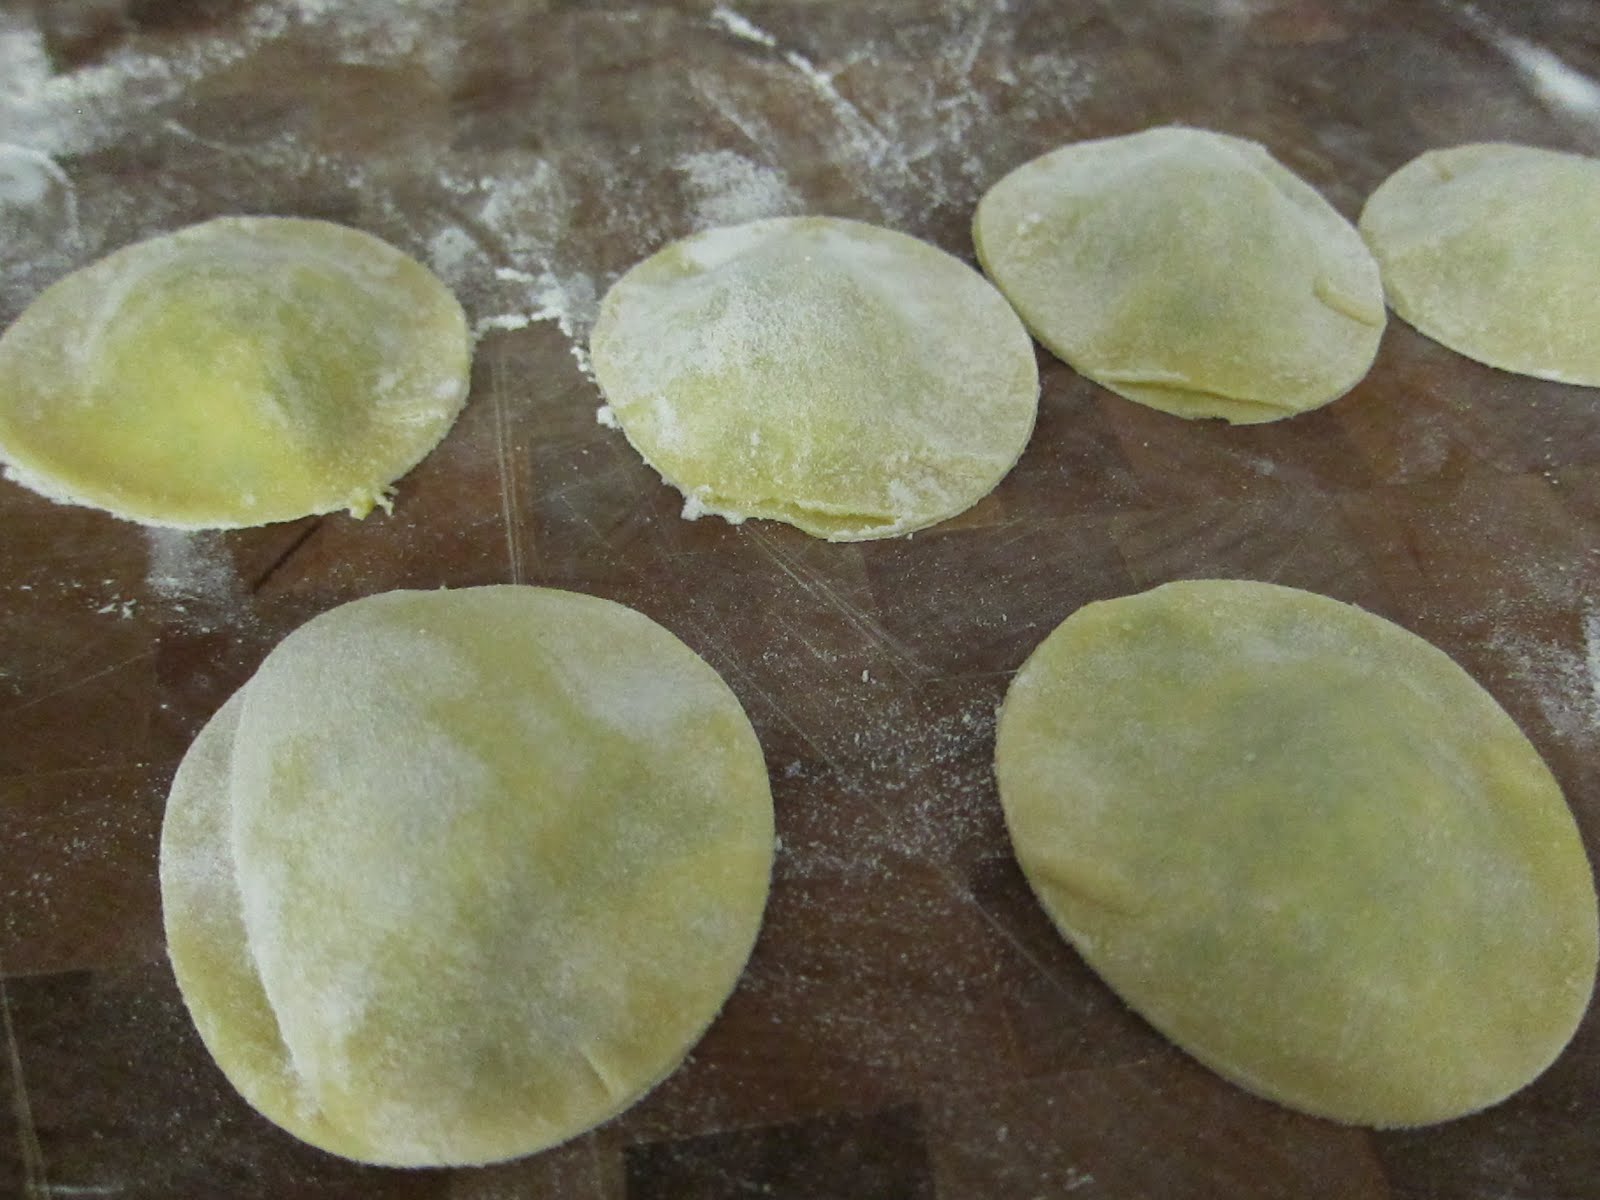
      Final ravioli product.
      Now even off the ends but just cutting them with a knife.  Place on your work surface and cut the size you want to work with.  I just cut mine the size of my cutting board.  Get a bowl of water and a brush to use as your glue.  Brush the bottom half of the pasta with the water and then start adding dollops of the filling.  You want about a heaping tablespoon for each one but I wouldn't do more than 2 tablespoons worth.  Leave space between each so you can cut them and seal them properly. Then fold over the dough and match the edges up and press to seal. Then use your fingers to work around the filing and gently press the pasta down.  You want to make sure to get all the air out of each one or they'll float in the boiling water instead of cook properly.  Once sealed and all air removed it is time to cut them.  I don't have anything fancy to cut mine I just used my circular biscuit cutter as that is what I had on hand.  You can certainly make your edges fancier or use a ravioli cutter I just didn't have the time.

      Finished ravioli.

      Now the last part is the easiest.  After all this work and effort it is nice to have the finishing sauce be so simple but so good.  Drop your ravioli in salted boiling water for about 3 minutes.  At the same time in a saute pan melt 1/2 stick of butter.  You only want to cook about 8 at a time in the pan though.  Add about 3 tbsp. of chicken stock to the butter.  Take your ravioli directly from the boiling water and place in the butter pan.  Sprinkle with a generous handful of Parmesan cheese, probably about 1/2 cup worth almost.  Then place on plate and serve with additional Parmesan cheese.  Of course, depending on how many you are making you can up the amount of butter and stock and just use a bigger pan if needed.  Of course, I topped mine with crispy bacon to give it a nice crunch, why not. Enjoy!

      Friday, September 9, 2011

      S'mores Pie

      I think my absolute favorite show on Food Network right now is Dessert First with Anne Thornton.  This is one of her recipes.  I have made almost 10 of her recipes and not one has disappointed me so far.  She is amazing.  This is so unbelievably simple but was really really good. I love chocolate, my daughter loves marshmallows and my husband loves pies so this was a win for all of us.  This took no time at all to whip together for a simple treat.  This is her actual recipe for this, here Spicy Smoky S'mores Bars.  I didn't do mine in bars but more like a pie and I didn't add .  I also didn't have enough of everything so figured my pie pan was half the size of the bars she was making.  I also wasn't interested in the Smoky Spicy aspect so just left out the chipolte.  I'm not a sweet and spicy dessert kinda gal.  

      S'mores Pie
      2 sticks unsalted butter softened
      18 plain graham crackers (about 2 packages)
      1/4 cup sugar
      1/2 teaspoon fine sea salt
      3 cups milk chocolate chips
      3 1/2 cups mini-marshmallows

      Preheat the oven to 350 degrees F.  In your food processor, grind the graham crackers into a fine meal (you need 2 cups). In a large bowl, combine your crumbs with the sugar, salt and melted butter. The mixture should look and feel like wet sand. Set aside a heaping 1/2 cup of the crumb mixture for the topping. Evenly press the remaining crumb mixture into the bottom the foil-lined pan. Pop your crust into the oven and bake until it is golden brown and your kitchen smells of graham crackers, 12 to 15 minutes. Remove the crust from the oven and allow it to cool on a rack or on a dishtowel on your counter.  Melt the milk chocolate in a saucepan over low heat, stirring continuously until fully melted. Do not turn up the heat to hurry this process, you must keep it on low. Alternately, you can microwave the chocolate on low power, stirring after 2 minutes. Preheat the broiler. Pour the melted chocolate over the cooled graham cracker crust. Spread the chocolate evenly over the crust with a butter knife. Sprinkle the marshmallows over the chocolate and press them lightly into the chocolate. Sprinkle the reserved crumb mixture over and in between the marshmallows so that you cannot see the chocolate peaking through the marshmallows. Broil 6 inches from the flame until the marshmallows are golden brown, 1 to 2 minutes.  Refrigerate until the chocolate is hard, 2 hours or so.

      Post shared with:
      Sweet as Sugar Cookies