Thursday, March 29, 2012

Asian Noodle Bowls

Another recipe I found while looking through The Pioneer Woman's blog.  I liked this because it was a cold noodle dish and something easy to feed everyone spur of the moment without too much fuss. I really liked it but no one else in my house did.  I wasn't a fan of the meat cold so I heated that up but I liked the flavors of this.  You can see her recipe here The Pioneer Woman   

Asian Noodle Bowl
 
1 whole Sirloin Steak, 3/4 To 1 Pound
 Salt To Taste
3/4 cups Soy Sauce
3 Tablespoons Pure Sesame Oil
2 Tablespoons Olive Oil
2 Tablespoons Rice Wine Vinegar
1 teaspoon Hot Chili Oil
2 cloves Garlic, Peeled And Minced Finely
2 teaspoons Minced Fresh Ginger
2 Tablespoons Packed Brown Sugar
1/2 cup Sliced Green Onion
8 ounces, weight Thin Noodles (I Used Thin Spaghetti)


Season both sides of the sirloin with salt. Grill on an outdoor grill or indoor grill pan until medium rare. Remove from heat and set aside.  In a bowl, combine soy sauce, sesame oil, olive oil, rice wine vinegar, hot chili oil, garlic, ginger, and brown sugar. Mix to combine, then taste and adjust flavors/seasonings to your taste.  When steak is cool enough, place in a large plastic storage bag. Add 3 tablespoons of dressing. Seal bag tightly and place in fridge until needed.  Cook pasta according to package directions. Drain and place in a bowl. Pour remaining dressing over the top and toss to combine. Finally, toss in green onions. Cover bowl with plastic wrap and refrigerate for at least a couple of hours or until cool. You can make the steak and noodles well in advance of when you want to serve.  To serve, remove steak from storage bag and slice against the grain into thin strips. Drizzle a little soy sauce over noodles just to give it a little flavor boost, throw in plenty of cilantro leaves, and toss to combine. Serve strips of beef over mound of noodles, or throw it all into a bowl together. Serve with chopsticks if you have them.

Wednesday, March 28, 2012

Cinnamon Whole Wheat Waffle

Another new waffle recipe, I know how many waffles can one person make but my kids love waffles and I like experimenting with new recipes.  I found this waffle recipe at A Little Nosh.  I love the cinnamon in these.   

2 large eggs
1 3/4 cups almond milk
1/4 cup coconut oil, melted
1 Tbsp honey
1 Tbsp. sugar
1/2 tsp cinnamon
1/4 tsp baking soda
1 1/2 cups whole wheat pastry flour
2 tsp baking powder
1/8 tsp salt

Preheat waffle iron.

In a large bowl, whisk eggs, milk, oil, honey, cinnamon, and baking soda until well combined.  Add in the flour, baking powder, and salt and whisk together just until large clumps disappear.  Spray waffle iron with cooking spray and pour some batter into the center.  My waffle iron takes about 1/4 cup batter for each waffle.  Cook until lightly browned.
If you want to freeze these, just cool to room temperature.  Lay waffles on a baking sheet and flash freeze them.  Once they're frozen, you can put them in a large freezer bag and just take out however many you need.  Toast in the toaster oven until warmed through.
 

Monday, March 26, 2012

Pasta Puttanesca

This is the first time I've ever made this recipe or ever had pasta puttanesca.  I'm not sure why because it was fantastic.  My husband doesn't like olives, onions, capers or anchovies.  That is probably why I've never even considered making this before.  This is Pioneer Woman, Ree Drummond's recipe that can be found on her site The Pioneer Woman.  I didn't mash the olives but instead sliced them so my husband could pick them out of his pasta.  I had to omit the onion all together.  One secret that he still doesn't know and I hope he doesn't read this and find out.  I did add the anchovies into the dish.  He loved the dish and if I told him he'd never eat it again.  So why ruin a delicious dish by telling him what was in it?  He hates all seafood.  I made sure to mash the anchovies up really good and let them dissolve in the oil when starting the sauce.  I made a bit too much and am excited that we'll be eating this again tomorrow as leftovers! 

Pasta Puttanesca

 8 ounces, weight Bucatini Or Spaghetti
2 Tablespoons Olive Oil
1/2 whole Red Onion, Sliced
1-1/2 cup Grape Tomatoes, Halved
3/4 cups White Wine
2 cloves Garlic
4 whole Anchovy Filets
1/2 cup (heaping) Assorted Pitted Olives
12 whole Basil Leaves
4 ounces, weight Good Parmesan Cheese

Cook pasta until al dente.  Mash (in this order) garlic, anchovies, and olives using a mortar and pestle, or just chop them finely together. Set aside.  Using a fork, crumble the Parmesan cheese.  Heat olive oil in a skillet over medium-high heat. Add sliced red onions and cook until slightly caramelized. Add halved tomatoes and cook for a couple of minutes. Pour in wine and cook for another two minutes, then pour in garlic/anchovy/olive mixture. Stir and continue cooking for several minutes, or until sauce is nice and reduced and wonderful. Add salt and pepper to taste.  Drain pasta and add to the skillet. Add the crumbled Parmesan and toss to coat pasta in the sauce.  Tear basil leaves and sprinkle over the top. Serve right out of the skillet.

Thursday, March 22, 2012

S'more Brownie Bites

My daughter saw these on Food Network in the last day or two and got so excited wanting to make these.  This is a Giada De Laurentis recipe that can be found here on Food Network.  Since she's still stuck indoors with a miserable cough how can I deny her!  She loved being able to crush up the graham crackers and place all the marshmallows into the brownie batter. 


S'more Brownie Bites

1 stick unsalted butter, at room temperature
1 1/4 cups mini chocolate chips
3/4 cup sugar
2 large eggs, at room temperature
2 teaspoons pure vanilla extract
1/2 cup all-purpose flour
1/2 cup quinoa flour
3/4 cup mini marshmallows
1/4 cup graham cracker crumbs or 4 large graham crackers, finely crushed

Place an oven rack in the center of the oven. Preheat the oven to 350 degrees F. Line a 24-count mini-muffin pan with paper liners or regular 12 muffin pan with liners.

Heat the butter in a small saucepan over low heat. Remove the pan from the heat and add 3/4 cup of the mini chocolate chips. Stir until the chocolate is melted and the mixture is smooth. Transfer the mixture to a medium bowl. Stir in the sugar, eggs and vanilla. Gradually beat in the flour until the mixture is thick and smooth. Stir in the remaining 1/2 cup mini chocolate chips.

Using a small cookie scoop, fill each paper liner with batter. Push mini marshmallows halfway down into the center of the batter, enough to nicely cover the top. Sprinkle 1/2 teaspoon of the graham cracker crumbs over the marshmallows. Bake until the marshmallows are puffed and light golden, 10 to 12 minutes for mini muffin tin and about 15-17 minutes for regular muffin pan. Cool for 20 minutes and serve.

Monday, March 19, 2012

Whole Wheat Berry Crepes


So I wanted to try something different for breakfast the other morning than our usual pancakes and decided to make crepes instead.  My daughter calls these the rolled pancakes and her favorite is to have hers spread with peanut butter and then rolled.  I personally like filling mine with frozen fruit that I reduce down into a syrup.  The first time I made these they took me quite a bit of time using just one pan.  Next time I made these I had two pans going at once so it made breakfast move along a lot faster and less complaints from the very hungry people in my house sitting at the table waiting.  My daughter wakes up and immediately goes and sits at the table and starts waiting for breakfast.  No pressure on me at all.  If I take too long in the kitchen grumbling starts.  Of course, because she is sitting at the table her little brother has to copy everything she does so then he immediately climbs into his seat too.  So now I have two kids sitting at the table and I haven't even had a chance to brush my teeth and walk out into the kitchen and even start breakfast yet!  I have some silly kids.  You can also lay these flat to cool and freeze them for quick breakfasts later too.  I like this recipe because you just add everything into the blender and let it whirl.  Makes clean-up easier.  You want to make sure you use less than a full ladle full of batter to a sprayed pan and hold it off the burner turning it all around allowing the batter to coat the entire bottom of the pan for a very thin even circular layer.  I have a thin spatula that once the first side is cooked you just really quickly flip it.  It may take a try or two to get the hang of it.  I usually ruin my first one every time.     

Whole Wheat Berry Crepes

1 c. whole wheat pastry flour
2 c. almond milk
2 egg whites
1 whole egg
1 tbsp. canola oil
1 tsp. vanilla extract
1 tbsp. honey
1 tbsp. orange zest
1/2 tsp. cinnamon

Add all ingredients into the blender and allow to mix until nice and smooth.  Heat a pan (or two) on a medium-low temperature and spray the pan with a non-stick spray.  Ladle about 3/4 of a ladle full of batter onto pan and coat bottom entirely creating a very thin circular crepe.  Flip after cooking about 2-3 minutes on one side.  Keep warm in a tea towel while you make the others.  Lay flat and fill with your favorite filling, such as jam, fruit, or peanut butter.  Roll and serve.

Sunday, March 18, 2012

Baked Sweet & Sour Chicken

Trying to lighten up one of my husband's favorites I came across this baked sweet and sour chicken on Life as a Lofthouse recently.   Of course, it isn't the same as the amazingly delicious deep fried version but for a lighter version it was good.  I normally don't like the sweet and sour sauce made with ketchup but because this sauce cooks in the oven for an hour it was pretty good.  I would say definitely use tinfoil to make your clean-up easier otherwise the sauce will probably never come off your pan!   


4 boneless skinless chicken breasts
Salt & Pepper
1 cup cornstarch
2 eggs, beaten
1/4 cup canola oil

Sweet and Sour Sauce:

3/4 cup sugar
4 tbsp. ketchup
1/2 cup vinegar
1 tbsp. soy sauce
1 tsp. garlic salt

Start by preheating your oven to 325 degrees. Rinse your chicken breasts in water and then cut into cubes. Season with salt and pepper to taste. Dip chicken into the cornstarch to coat then dip into the eggs.  Heat your 1/4 cup oil in a large skillet and cook your chicken until browned but not cooked through. Place the chicken in a 9x13 greased baking dish. Mix all of your sweet and sour sauce ingredients in a bowl with a whisk and then pour evenly over the chicken. Bake for one hour and during the baking process you will need to turn the chicken every 15 minutes.  

Thursday, March 15, 2012

Midnight Sin Chocolate Cupcakes with FakeOut Buttercream Frosting

I didn't really have a good reason to make cupcakes yesterday other than I wanted them.  Every time I go to the grocery store I see all the baked goods that I can't have because of dairy.  I've yet to try making a 100% dairy free cupcake with frosting and decided yesterday was the day to give it a try.  These actually turned out so good you wouldn't even realize they were dairy-free.  Of course if you can have dairy I suggest using it but for us non-dairy goers this recipe was awesome.  I found the cake recipe at Not So Humble Pie and the frosting recipe was just an altered version of a Wilton recipe.  The original recipe was called Midnight Sin Chocolate Cake.  It was good but I'm thinking the original recipe would have been magnificent.  If you can have dairy I'd definitely check out the original recipe that includes a chocolate mousse filling and chocolate ganache topping.  It does definitely look sinful.   And of course anything dessert in my house gets a healthy dose of sprinkles because my kids think that is the perfect finishing touch to our masterpiece!       


Midnight Sin Chocolate Cake

2 3/4 cups granulated sugar
3/4 teaspoon salt
3/4 cup dutch processed cocoa powder
1 teaspoon baking soda
1 cup boiling water
1 cup canola oil
2 teaspoons vanilla extract
2 teaspoons instant expresso powder
1 3/4 cups, spooned and leveled unbleached all-purpose flour
4 large egg yolks
2 large eggs
1/4 cup almond milk (You can also use buttermilk)
1/2 tsp. lemon juice

Preheat your oven to 350°F. Place a rack in the lower third of the oven and set a baking stone on it. (The stone helps the cake bake evenly and prevents humped tops. If you don't have a stone, the cake will survive don't worry. Just be prepared to trim any uneven tops and make sure the cake gets an adequate amount of time in the oven to fully cook.)

You'll need two 9" or two 8"cake pans for this cake or muffin tin. Spray the pans with non-stick spray oil and then line them with parchment (sides and bottom--this is a sticky cake) then spray the parchment with even more non-stick spray. 

In a medium sauce pan, combine the sugar, dutch processed cocoa, salt and baking soda. Stir with a whisk until combined and then slowly add the boiling water while whisking. This will bubble up a bit while the baking soda reacts with any remaining acidity in the dutch processed cocoa. Once thoroughly mixed, place the sauce pan over medium-high heat and bring back to a boil. Then remove from heat and allow to stand for a minimum of 10 minutes. This step makes the dutch processed cocoa even more alkaline, so our cake will be nearly black. 

While waiting on the chocolate mixture, get your mise en place goin' on! Measure out the flour, almond milk and add lemon juice to that, and separate the eggs.   Add the oil and vanilla to the bowl of your stand mixer with the paddle attachment (this can also be done by hand with a wooden spoon). 
When the chocolate mixture is ready, stir in the instant espresso powder. (This won't make the cake taste like coffee, rather it enhances the chocolate flavor of the cake. Dutch processed cocoa has great color but it isn't quite as flavorful as it's light-colored acidic cousin, natural cocoa.) Add the chocolate mixture to your stand mixer and mix on low speed for about 20 seconds. Add the flour and continue to mix on low until combined. With a minimum amount of beating, add the egg yolks, eggs, vanilla and milk. The batter will be very thin. 

Divide the batter between your two pans and place in the oven on your baking stone.  Bake for 25-30 minutes (for 9" rounds. Add 5-7 more minutes for 8" rounds) until the center of the cake springs back when you touch it.  For cupcakes it takes about 18-20 minutes.  Allow the cake to cool for 10 minutes on a wire rack. Run a thin knife around the edge of the cake to loosen and invert onto a flat dish lined with parchment.   Allow to cool completely then wrap the rounds individually in plastic and place in the refrigerator to chill before assembling.


FakeOut Buttercream Frosting:

1/2 cup solid vegetable shortening
1/2 cup non-dairy butter substitute, softened
3/4 cup cocoa 
1 tsp. vanilla extract
4 cups sifted confectioners' sugar
3 tbsp. almond milk

This makes about 3 cups of frosting.  In large bowl, cream shortening and butter with electric mixer. Add cocoa and vanilla. Gradually add sugar, one cup at a time, beating well on medium speed. Scrape sides and bottom of bowl often. When all sugar has been mixed in, icing will appear dry. Add milk and beat at medium speed until light and fluffy. Keep bowl covered with a damp cloth until ready to use. For best results, keep icing bowl in refrigerator when not in use. Refrigerated in an airtight container, this icing can be stored 2 weeks. Rewhip before using.

Wednesday, March 14, 2012

Homemade Ziplock Lemonade

I've been trying to find fun activities for my daughter to do while she's stuck in the house recovering from illness.  Today we did ziplock lemonade.  This was something that both my 1 1/2 year old and 4 year old enjoyed.  It was easy, relatively mess free and tasty.  I found this activity on Education.com


Ziplock Lemonade

2 Ziploc bags
Lemon, quartered and seeds removed
1 c. cold water
2-4 tsp. sugar
Ice (*optional)
2 Straws

Simply cut a lemon into quarters and remove any seeds.  Place one quarter of the lemon into the ziplock bag.  Add 1-2 tsp. of sugar and 1/2 cup of water.  Zip the bag securely.  Gently mix th2 contents of the bag, squeezing the lemon for about 1 minute.  Open a small section of the bag and place a straw inside.  You can add a few ice cubes if you want.  My daughter wanted hers extra sour so added extra lemon wedges.    This made 2 lemonades.

    Peanut Butter Oatmeal Cookies

    Searching for a cookie recipe to let my kids make today I decided on this peanut butter oatmeal cookie from Sweet as Sugar Cookies.  I figured if she said it was good, then I believed her.  She didn't steer us wrong either, these cookies were really good.  My kids had fun making these and really enjoyed eating them too. We've had peanut butter cookies and we've had oatmeal cookies but we've never had a peanut butter oatmeal cookie.    


    Ultimate Peanut Butter Oatmeal Cookies

    1/2 c. unsalted butter (I use non-dairy butter spread)
    1/2 c. peanut butter
    1/2 c. sugar
    1/2 c. brown sugar
    1 egg
    1 tsp. vanilla
    3/4 c. flour
    1/2 tsp. baking soda
    1/4 tsp. baking powder
    1/2 tsp. salt
    1 c. rolled oats

    Cream the butter with the peanut butter and sugars. Add the egg and vanilla. Combine flour, baking soda, baking powder, and salt. Add to the peanut butter mixture. Mix in the oats. Drop by tablespoonfuls onto a baking sheet and bake at 350F for 10 min. or until cookies are firm to the touch.

    Monday, March 12, 2012

    Blackberry Cobbler

     Where in the world have I been?  It seems that when I'm dieting, exercising and avoiding dairy, white bread products and desserts that I am not quite as excited about cooking and baking like I use to be.  On top of that my daughter has been so sick this winter with pneumonia twice, the flu and even an allergic reaction to penicillin that left her with the worst looking rash I've ever seen over every square inch of her entire little body that was beyond itchy for over a week.  Everyone told me the first year my daughter went to school would leave our household with constant illness but I could never have imagined we'd end up as bad off as we did this winter!  

    Anyways, I'm hoping to get back into the swing of things and am hoping to have the energy to start posting again and trying new recipes.  I've made so many delicious meals in the last month that I've been simply too exhausted to even try to make look pretty enough for a picture so it looks like my house is in for some repeats of those tasty recipes.  

    I made this recipe this week in honor of Spring and in hopes that it will get here soon.  We could use some warmth, sunshine and fresh air.     

    This is a quick, easy throw together blackberry cobbler recipe that I got from Ree Drummond at Food Network.  This takes less than 5 minutes to throw together and can bake while everyone is sitting around eating dinner.  My entire family really enjoyed this last night.

    Blackberry Cobbler

    1/2 stick melted butter (I use non-dairy butter)
    1 1/4 c. + 2 tbsp. sugar
    1 c. self rising flour
    1 c. almond milk (or regular milk)
    2 c. fresh or frozen blackberries

    Preheat the oven to 350 degrees F. Grease a 3-quart baking dish with butter.  In a medium bowl, whisk 1 cup sugar with the flour and milk. Whisk in the melted butter.  Rinse the blackberries and pat them dry. Pour the batter into the baking dish. Sprinkle the blackberries evenly over the top of the batter. Sprinkle 1/4 cup sugar over the blackberries. Bake until golden brown and bubbly, about 1 hour. When 10 minutes of the cooking time remains, sprinkle the remaining 2 tablespoons sugar over the top. Serve with ice cream.  Our new favorite is a coconut milk vanilla ice cream.  Yummy!

    Recipe shared with:

    Chef in Training 

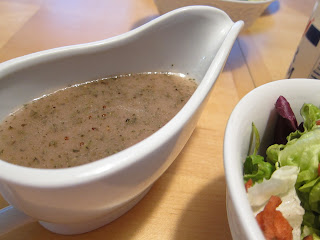
    Homemade Italian Vinegarette

    This is my favorite homemade salad dressing.  I make this in a big batch usually on the weekend so it lasts me long enough to have salads all week.  You will probably want to add extra oil to yours though as I like mine more tangy than a normal person should.


    Homemade Italian Vinegarette

    1 c. red wine vinegar
    3 tbsp. rice wine vinegar
    2 tbsp. dijon mustard
    1 1/2 tbsp. honey
    2 tsp. dried basil (or fresh if you have it)
    1 c. canola oil
    Pinch of salt & pepper

    Combine all ingredients except oil and whisk until combined.  Slowly add in the oil and whisk while incorporating it.  Give it a taste and add more oil as needed.  Store in an air tight container for 1-2 weeks.