Showing posts with label Dessert. Show all posts

Thursday, December 27, 2012

Amish Friendship Bread

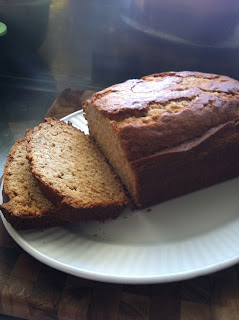
One of my closest friends here in Japan gave me this friendship bread.  I've never had it before and never heard of it before but the idea of it is really a cute idea.  You make a starter and it has to sit for 10 days.  You add something to it on day 5 and day 10 then you split it into 4 batches.  You keep one batch and then you remove 1 cup and place it into three separate containers that you then give to your friends with the instructions for them to keep the starter and eventually end with bread while they then do the same thing and give three of their friends a starter.  It think it has been a while since making bread here in my house so everyone was very excited.  It certainly didn't disappoint either.  It was really tasty.  It has the texture and density much like a banana bread but with cinnamon instead. The original recipe claims that you cannot use anything metal and must use plastic or wooden utensils and a plastic or glass container/bowl when making this so not sure how true it is but passing that tid bit on as well. 

Amish Friendship Bread Starter:

1 pkg. active dry yeast
1/4 cup warm water (110 degrees F)
1 cup all-purpose flour
1 cup white sugar
1 cup warm milk (110 degrees F)


In a small bowl, dissolve the yeast in warm water for about 10 minutes. Stir well.  In a 2 quart glass or plastic container, combine 1 cup sifted flour and 1 cup sugar. Mix thoroughly or the flour will get lumpy when you add the milk.  Slowly stir in warm milk and dissolved yeast mixture. Loosely cover the mixture with a lid or plastic wrap. The mixture will get bubbly. Consider this Day 1 of the cycle, or the day you receive the starter.

For the next 10 days handle starter according to the instructions for Amish Friendship Bread below.

Amish Friendship Bread Recipe

Day 1 - receive the starter (the recipe for the starter is below)
Day 2 - stir
Day 3 - stir
Day 4 - stir
Day 5 - Add 1 cup each flour, sugar and milk.
Day 6 - stir
Day 7 - stir
Day 8 - stir

Day 9 - stir
Day 10 - Add 1 cup flour, 1 cup sugar and 1 cup milk. Divide into 4 containers, with 1 cup each for three of your friends and 1 cup for your own loaves. Give friends the instructions for Day 1 through Day 10 and the following recipe for baking the bread. After removing the 3 cups of batter, combine the remaining cup of Amish Friendship Bread starter with the following ingredients in a large bowl:

2/3 cup oil
3 eggs
1/2 tsp. salt
1 tsp. vanilla
1 to 1 1/2 tsp. cinnamon
1 cup sugar
2 cups flour
1 1/4 tsp. baking powder
1/2 tsp. baking soda

(**optional) 1 cup nuts/1 cup of raisins

Using a wooden spoon beat by hand until well blended. You can add 1 cup raisins and 1 cup nut. Grease a loaf pan with butter, sprinkle with sugar instead of flour.
Bake at 325 degrees for 1 hour.  Check for doneness by inserting a toothpick and if it comes out clean it is done.  Otherwise bake an additional 10-15 minutes until done.  If it starts getting too brown while cooking cover with aluminum foil and finish baking. Cool 10 minutes, remove from pan. Makes 1 large loaf of Amish Friendship Bread.
Sunday, December 9, 2012

Chocolate Almond Butter Protein Balls


I am soooo in love with these.  My kids beg for them.  My husband even eats them!  I've made these with peanut butter with pure maple syrup and almond butter with honey and I think the almond butter and honey are perfect and absolutely amazing!  They are so healthy but yet feel like a dessert cheat.  This time of year with Christmas fast approaching I always find I need cookies and desserts and these really hit the spot.  Of course, much like a cookie, you can't eat juts one so at almost 100 calories a ball the calories can add up quick but at least it is good for you, not stick to your hips and butt type of calories!

Now the version in the picture is minus the chocolate and I used vanilla protein powder just because the chocolate ones looked soooo unpleasant when it came picture time so you can totally make these vanilla or chocolate whatever you like best!   The original recipe as written below uses 1/4 c. of honey, I however prefer mine with 1/8 c. of honey so it all has to do with how sweet you like them you can add or subtract it to your preference.

Chocolate Almond Butter Protein Balls   

1/2 c. almond butter
1/4 c. honey
1 scoop chocolate (soy) protein powder (*or vanilla)
1/4 c. ground flax seed
2 tbsp. cocoa (*optional)
1 c. old fashioned rolled oats (dry)
1 tbsp. coconut oil

Makes 18 large balls or 36 bite size balls.  I'm working on the exact calorie count and nutritional information for these but it is roughly 90 calories a tbsp. size ball.


This post shared with:

Not Your Ordinary Recipes

Wednesday, November 7, 2012

Dairy-Free Pumpkin Streusel Pie

When it comes to the holidays it is really hard to eat dairy-free.  Rolls, macaroni and cheese, mashed potatoes, pies, cakes, cookies.  They all have dairy in them.  Every Thanksgiving I make a pumpkin pie.  Who doesn't?  I love, love, love Pumpkin Pie.  Well since giving up dairy the beginning of this year I've been dreading Thanksgiving.  How am I going to do a traditional Thanksgiving feast with no dairy whatsoever?!  I decided to start with a pie makeover.  I wanted to take my all time favorite pumpkin recipe and make it dairy free but I wanted every single person that ate it to have absolutely no clue in the world that it was missing all the cream and butter it normally has.  Well, I've done it.  I've knocked it out of the park and couldn't be happier!  My entire family absolutely loves it.  I think it is amazing and am thrilled with how it turned out!  My secret - silken tofu pureed in place of heavy cream! 
 

Pumpkin Struesel Pie

Pie Filling:
1 15oz. can pure pumpkin 
3 tbsp. all-purpose flour
1/3 c. firmly packed dark brown sugar
2 tsp. pumpkin pie spice
2 tsp. ground cinnamon
8 oz. silken tofu, drained
1 c. pure maple syrup
3 large eggs

Streusel Topping:
1 c. chopped pecans
1/2 c. firmly packed dark brown sugar
4 tbsp. all-purpose flour
1 tsp. ground cinnamon
6 tbsp. unsalted dairy-free butter, very cold (I use organic Smart Balance Vegan Spread)

Combine the pumpkin, brown sugar, cinnamon, pumpkin pie spice, flour and salt in a mixer with whisk attachment and beat until just combined.  In a blender add the silken tofu and maple syrup and puree until completely smooth.  Add the syrup tofu mixture into the pumpkin mixture and beat until well combined.  Stop and scrape down sides and add in eggs one at a time and beat until combined.  Pour into pie crust and bake 425 degrees for 15 minutes.  Then turn oven down to 350 degrees and bake another 35 minutes.  While it is baking combine all streusel ingredients in a bowl and use a fork or your hands and crumble it together until the butter is about the size of peas and almost all streusel mixture is sticky and crumbly.  Take pie out of oven and sprinkle streusel all over the top of it.  Place back in the oven for another 20 minutes.  Allow to cool completely before serving so pie has time to set.  The pie should still be a bit jiggly in the middle when you remove it and it will set as it cools.  A firm non-jiggly center means it is overcooked.     

Dairy-Free Pie Dough:

3 c. flour
2 tbsp. sugar
1/2 c. shortening
12 tbsp. non-dairy butter
1/2 c. ice cold water

Place the shortening in fridge ahead of time or freezer to get it nice and cold before you prepare the dough.  Dice the butter and place it back into the refrigerator. Place the flour, salt, and sugar in the bowl of a food processor fitted with a steel blade and pulse a few times to mix. Add the very cold butter and very cold shortening. Pulse a few times until the butter is bite size. Turn the machine on and slowly add the ice water down the feed tube until the dough begins to form a ball. Dump out on a floured board and roll into a ball.  Divide and press into a flat circle and wrap in plastic wrap and refrigerate for 30 minutes. Roll each piece on a well-floured board into a circle.  This makes 2 pie crusts.  The other can be refrigerated a few days or placed in the freezer for later use.  Make sure to spray your pie pan before rolling it out though to prevent it from sticking once it is baked.   

NOTE:  Organic Smart Balance Vegan Spread is like using salted butter.  So I opt to omit the salt from my pie recipe and the pie crust. 


Saturday, September 1, 2012

Chocolate Coconut Whip Cream (Dairy-Free)

As a person that has eaten dairy my entire life I know how awesome things like ice cream, pizza, and whip cream are.  Of course, realizing that I'm allergic to dairy and can't eat it without getting ill I have to miss out on certain things.  I can make a dairy-free molten lava cake but I don't get that dollop of whip cream on top anymore.  Or do I?  I saw this recipe somewhere on Pinterest at one point and thought no way, can it be, can it really be whip cream that is dairy-free?  The answer is YES!  Not only is it a whip cream like consistency I personally think it's even better than regular whip cream!  It is super easy to make.  My entire family really enjoyed it and complained that I didn't make enough. This recipe made about 4 shot glass sizes worth of whip cream.  This to me tastes like a chocolate mousse.  Totally worth trying and I'm exciting to make a non-chocolate version to top my favorite pies and desserts with in the future!

Chocolate Coconut Whip Cream

1 can of coconut milk (refrigerated)
3 tbsp. powdered sugar
2 tbsp. cocoa powder
1/4 tsp. vanilla extract

First you must place a can of coconut milk (not lite or coconut cream, but a regular can you find in the ethnic aisle at the store like Thai Organics Coconut Milk) in the refrigerator overnight.  The next day open the can and remove all of the thick coconut cream off the top of the can and leave the liquid at the bottom of the can (save that, I'm going to post a recipe using that for coconut banana french toast next).  Sift your powdered sugar and cocoa powder to make sure there are no lumps.  Add it to the bowl with the coconut cream and whisk to combine.  Add in the vanilla.  Whisk until fluffy.  Taste to determine if you want more sugar added in or not, I like mine a bit more bitter.  Then place back into the fridge for another hour or two and it'll get thicker.  You can spoon it into whatever you plan to serve it in before placing it back in the fridge so you can just serve it as a dessert or top your favorite dessert with it.  You will not be disappointed!!  

Friday, April 27, 2012

Boston Cream Pie Cupcake


This cupcake was awesome. I found this recipe on That Skinny Chick Can Bake and that recipe was adapted from a Martha Stewart recipe.  I used the cupcake and ganache recipe from that site but I used my own pastry cream recipe because I've had such great success with it and didn't want to try anything else when I already love my pastry cream.  My husband felt there wasn't enough pastry cream in the middle so I had to drizzle it on top too.  


Cupcakes:
6 tablespoons butter, plus more to grease the cupcake tins
1 1/2 cups flour, plus more to dust the cupcake tins
1 1/2 teaspoons baking powder
1/2 teaspoon salt
1/2 cup milk
3 eggs, at room temperature
1 cup sugar
1 teaspoon vanilla

Preheat oven to 350º.  Grease cupcake tins (makes about 20 cupcakes), then dust with flour.  Set aside.
Cut butter into tablespoon sized pieces.  Heat butter and milk in microwave till butter is melted. Set aside.

In electric mixer, whip sugar and eggs on high till fluffy and pale yellow, and thick enough to form a ribbon when mixture drips off whisk attachment...about 5 minutes.  Reduce speed to medium and add baking powder, salt, then slowly add flour.  Mix only till just incorporated.
With mixer on low speed, slowly add milk and butter mixture.  Mix just till smooth.  Add vanilla and mix just till incorporated.

Divide batter into the 20 cupcake slots...about halfway full.  Bake, rotating halfway through if needed (check to see if baking evenly), for about 15 minutes.  Check by gently pressing center of cupcakes with finger...if done, the cake will spring back immediately.

To serve, either cut out a part of the center to fill with pastry cream and replace top on hole or cut cupcakes carefully in half with serrated knife, top bottom half with about one tablespoon of pastry cream, add top half and drizzle with ganache.

Pastry Cream:

2 c. half-and-half

1/2 c. sugar

pinch of salt

5 large egg yolks

3 tbsp. cornstarch

4 tbsp. (1/2 stick) unsalted butter

1 1/2 tsp. vanilla extract


Heat half-and-half, 6 tbsp. sugar and salt in saucepan over medium heat until simmering and sugar is dissolved.  Meanwhile whisk the egg yolks in a medium bowl until combined.  Whisk in the remaining 2 tbsp. sugar until thick and creamy about 30 seconds.  Whisk in the cornstarch until pale yellow, about 30 seconds. Gradually whisk the half-and-half mixture into the yolk mixture to temper.  Be VERY slow so you don't scramble your eggs.  Return the entire mixture to the saucepan scraping bowl with spatula and return to a simmer over medium heat whisking constantly until a few bubbles burst on the surface and the mixture is thickened and glossy, like a pudding.  Off the heat whisk in the butter and vanilla.  Strain through a fine mesh sieve over a bowl.  Press plastic wrap directly on the surface to prevent a skin from forming and refrigerate until set and cold which is at least 4 hours and up to 2 days.    

Chocolate Ganache:
6 ounces semi-sweet chocolate, chopped
2/3 cup heavy cream
1 tablespoon light corn syrup (or honey)

Heat cream and corn syrup in microwave till hot.  Add chopped chocolate, and let stand till chocolate starts to melt.  Stir until smooth.

Sunday, April 15, 2012

Chocolate Peep Nests

 We made these peep nests on Easter.  I'm not sure where I saw this or who I heard about it from but I didn't have a recipe and I'm pretty sure I used too much chocolate since my kids were covered in it by the time we were done.  Both the kids loved getting elbow deep into the chocolate and helping me make these nests.  Once we finished and put the eggs in the nests and took out the mama peeps my husband sat down to eat his dessert.  My daughter told him that she loved the peeps and their babies so very much that she couldn't bare the thought of any of us eating them.  I think he was a bit disappointed that he wasn't allowed to eat his dessert!  Later the chocolate got the best of her and she did allow everyone to eat them.

Chocolate Peep Nests

1 bag semi-sweet chocolate chips
1/2 c. butterscotch chips
1 - 5 oz. can chow mien noodles
12 peeps
Bag of M&M's (we used the speckled M&M eggs)

Melt the chocolate and butterscotch chips together over a double boiler.  Dump the entire thing of the chow mien noodles out into a bowl.  Pour chocolate mixture over the top and stir to combine.  Using a muffin pan, spray generously with cooking spray and place chocolatey chow mien noodles into each muffin tin.  I used the back of a spoon to create an indent in the center of each to form the nest and give the candy eggs a place to rest.  Allow to harden in refrigerator for about an hour.  I used a butter knife and just popped it into the side of each muffin tin and the chocolate nest popped out.  Top with candy eggs and peeps.   

Wednesday, April 4, 2012

Blueberry Crumb Cake

I love wild blueberries.  I mean regular blueberries are good but wild blueberries are awesome.  The fresh blueberries here are way too expensive and look sad but I can get frozen wild blueberries so I buy those and use them.  Since Spring is around the corner, well for us anyways.  I know many people in the states it has been unseasonably warm already but for us in Japan it is still cold and jacket weather.  I decided to make this blueberry crumb cake.  As it was baking in the oven all I could think about was eating a nice big slice of this cake with a Grande Soy Carmel Macciato.  I don't have coffee in my house anymore since giving up dairy because what's a cup of coffee without half and half?  My wonderful husband voluntarily gave up coffee as well since he knew how much I loved it and how hard it was for me to do.  I watched everyone in my house eat this cake for two days while I patiently waited for my Starbucks drink.  Today was finally that day.  After a trip to the doctors office with my kids I found a parking spot next to Starbucks.  That sounds easy but here there is no parking, parking is a thing nightmares are made of.  Even here on the Navy base, parking is non-existent.  With sick kids I can't just walk and get my coffee but I snatched up that spot and had to carry my sleeping 2 year old into Starbucks to get us all some drinks before heading home and heating up that amazing blueberry cake.  It was well worth the wait.  This cake is amazing, especially the topping with the layer of sugar sprinkled over the top.

1/2 stick non-dairy butter (or regular)
1 Tablespoon (additional) non-dairy Butter
3/4 cups Sugar
1 whole Egg
1/2 teaspoon Vanilla Extract
2 cups All-purpose Flour
2-1/4 teaspoons Baking Powder
1/2 teaspoon Salt
3/4 cups Almond Milk (or whole milk)
2 cups Fresh or frozen Blueberries


FOR THE TOPPING:
3/4 sticks non-dairy Butter (or regular)
1/2 cup Sugar
1/2 teaspoon Cinnamon
1/2 cup Flour
1/4 teaspoon Salt

 Preheat oven to 350 degrees.  Combine flour, baking powder, and a salt. Stir and set aside.
Cream 1/2 stick plus 1 tablespoon butter with cinnamon and sugar. Add egg and mix until combined. Add vanilla and mix. Add flour mixture and milk alternately until totally incorporated. Do not overbeat. Stir in blueberries until evenly distributed.  Grease a 9 x 13 inch baking pan. Pour in batter.
In a separate bowl, combine topping ingredients and cut together using two knives or a pastry cutter. Sprinkle over the top of the cake.  Sprinkle 1-2 tbsp. of sugar over the top.  Bake cake for 40 to 45 minutes, or until golden brown. Cut into squares and serve with softened butter.

Thursday, March 22, 2012

S'more Brownie Bites

My daughter saw these on Food Network in the last day or two and got so excited wanting to make these.  This is a Giada De Laurentis recipe that can be found here on Food Network.  Since she's still stuck indoors with a miserable cough how can I deny her!  She loved being able to crush up the graham crackers and place all the marshmallows into the brownie batter. 


S'more Brownie Bites

1 stick unsalted butter, at room temperature
1 1/4 cups mini chocolate chips
3/4 cup sugar
2 large eggs, at room temperature
2 teaspoons pure vanilla extract
1/2 cup all-purpose flour
1/2 cup quinoa flour
3/4 cup mini marshmallows
1/4 cup graham cracker crumbs or 4 large graham crackers, finely crushed

Place an oven rack in the center of the oven. Preheat the oven to 350 degrees F. Line a 24-count mini-muffin pan with paper liners or regular 12 muffin pan with liners.

Heat the butter in a small saucepan over low heat. Remove the pan from the heat and add 3/4 cup of the mini chocolate chips. Stir until the chocolate is melted and the mixture is smooth. Transfer the mixture to a medium bowl. Stir in the sugar, eggs and vanilla. Gradually beat in the flour until the mixture is thick and smooth. Stir in the remaining 1/2 cup mini chocolate chips.

Using a small cookie scoop, fill each paper liner with batter. Push mini marshmallows halfway down into the center of the batter, enough to nicely cover the top. Sprinkle 1/2 teaspoon of the graham cracker crumbs over the marshmallows. Bake until the marshmallows are puffed and light golden, 10 to 12 minutes for mini muffin tin and about 15-17 minutes for regular muffin pan. Cool for 20 minutes and serve.

Thursday, March 15, 2012

Midnight Sin Chocolate Cupcakes with FakeOut Buttercream Frosting

I didn't really have a good reason to make cupcakes yesterday other than I wanted them.  Every time I go to the grocery store I see all the baked goods that I can't have because of dairy.  I've yet to try making a 100% dairy free cupcake with frosting and decided yesterday was the day to give it a try.  These actually turned out so good you wouldn't even realize they were dairy-free.  Of course if you can have dairy I suggest using it but for us non-dairy goers this recipe was awesome.  I found the cake recipe at Not So Humble Pie and the frosting recipe was just an altered version of a Wilton recipe.  The original recipe was called Midnight Sin Chocolate Cake.  It was good but I'm thinking the original recipe would have been magnificent.  If you can have dairy I'd definitely check out the original recipe that includes a chocolate mousse filling and chocolate ganache topping.  It does definitely look sinful.   And of course anything dessert in my house gets a healthy dose of sprinkles because my kids think that is the perfect finishing touch to our masterpiece!       


Midnight Sin Chocolate Cake

2 3/4 cups granulated sugar
3/4 teaspoon salt
3/4 cup dutch processed cocoa powder
1 teaspoon baking soda
1 cup boiling water
1 cup canola oil
2 teaspoons vanilla extract
2 teaspoons instant expresso powder
1 3/4 cups, spooned and leveled unbleached all-purpose flour
4 large egg yolks
2 large eggs
1/4 cup almond milk (You can also use buttermilk)
1/2 tsp. lemon juice

Preheat your oven to 350°F. Place a rack in the lower third of the oven and set a baking stone on it. (The stone helps the cake bake evenly and prevents humped tops. If you don't have a stone, the cake will survive don't worry. Just be prepared to trim any uneven tops and make sure the cake gets an adequate amount of time in the oven to fully cook.)

You'll need two 9" or two 8"cake pans for this cake or muffin tin. Spray the pans with non-stick spray oil and then line them with parchment (sides and bottom--this is a sticky cake) then spray the parchment with even more non-stick spray. 

In a medium sauce pan, combine the sugar, dutch processed cocoa, salt and baking soda. Stir with a whisk until combined and then slowly add the boiling water while whisking. This will bubble up a bit while the baking soda reacts with any remaining acidity in the dutch processed cocoa. Once thoroughly mixed, place the sauce pan over medium-high heat and bring back to a boil. Then remove from heat and allow to stand for a minimum of 10 minutes. This step makes the dutch processed cocoa even more alkaline, so our cake will be nearly black. 

While waiting on the chocolate mixture, get your mise en place goin' on! Measure out the flour, almond milk and add lemon juice to that, and separate the eggs.   Add the oil and vanilla to the bowl of your stand mixer with the paddle attachment (this can also be done by hand with a wooden spoon). 
When the chocolate mixture is ready, stir in the instant espresso powder. (This won't make the cake taste like coffee, rather it enhances the chocolate flavor of the cake. Dutch processed cocoa has great color but it isn't quite as flavorful as it's light-colored acidic cousin, natural cocoa.) Add the chocolate mixture to your stand mixer and mix on low speed for about 20 seconds. Add the flour and continue to mix on low until combined. With a minimum amount of beating, add the egg yolks, eggs, vanilla and milk. The batter will be very thin. 

Divide the batter between your two pans and place in the oven on your baking stone.  Bake for 25-30 minutes (for 9" rounds. Add 5-7 more minutes for 8" rounds) until the center of the cake springs back when you touch it.  For cupcakes it takes about 18-20 minutes.  Allow the cake to cool for 10 minutes on a wire rack. Run a thin knife around the edge of the cake to loosen and invert onto a flat dish lined with parchment.   Allow to cool completely then wrap the rounds individually in plastic and place in the refrigerator to chill before assembling.


FakeOut Buttercream Frosting:

1/2 cup solid vegetable shortening
1/2 cup non-dairy butter substitute, softened
3/4 cup cocoa 
1 tsp. vanilla extract
4 cups sifted confectioners' sugar
3 tbsp. almond milk

This makes about 3 cups of frosting.  In large bowl, cream shortening and butter with electric mixer. Add cocoa and vanilla. Gradually add sugar, one cup at a time, beating well on medium speed. Scrape sides and bottom of bowl often. When all sugar has been mixed in, icing will appear dry. Add milk and beat at medium speed until light and fluffy. Keep bowl covered with a damp cloth until ready to use. For best results, keep icing bowl in refrigerator when not in use. Refrigerated in an airtight container, this icing can be stored 2 weeks. Rewhip before using.

Wednesday, March 14, 2012

Peanut Butter Oatmeal Cookies

Searching for a cookie recipe to let my kids make today I decided on this peanut butter oatmeal cookie from Sweet as Sugar Cookies.  I figured if she said it was good, then I believed her.  She didn't steer us wrong either, these cookies were really good.  My kids had fun making these and really enjoyed eating them too. We've had peanut butter cookies and we've had oatmeal cookies but we've never had a peanut butter oatmeal cookie.    


Ultimate Peanut Butter Oatmeal Cookies

1/2 c. unsalted butter (I use non-dairy butter spread)
1/2 c. peanut butter
1/2 c. sugar
1/2 c. brown sugar
1 egg
1 tsp. vanilla
3/4 c. flour
1/2 tsp. baking soda
1/4 tsp. baking powder
1/2 tsp. salt
1 c. rolled oats

Cream the butter with the peanut butter and sugars. Add the egg and vanilla. Combine flour, baking soda, baking powder, and salt. Add to the peanut butter mixture. Mix in the oats. Drop by tablespoonfuls onto a baking sheet and bake at 350F for 10 min. or until cookies are firm to the touch.

Monday, March 12, 2012

Blackberry Cobbler

 Where in the world have I been?  It seems that when I'm dieting, exercising and avoiding dairy, white bread products and desserts that I am not quite as excited about cooking and baking like I use to be.  On top of that my daughter has been so sick this winter with pneumonia twice, the flu and even an allergic reaction to penicillin that left her with the worst looking rash I've ever seen over every square inch of her entire little body that was beyond itchy for over a week.  Everyone told me the first year my daughter went to school would leave our household with constant illness but I could never have imagined we'd end up as bad off as we did this winter!  

Anyways, I'm hoping to get back into the swing of things and am hoping to have the energy to start posting again and trying new recipes.  I've made so many delicious meals in the last month that I've been simply too exhausted to even try to make look pretty enough for a picture so it looks like my house is in for some repeats of those tasty recipes.  

I made this recipe this week in honor of Spring and in hopes that it will get here soon.  We could use some warmth, sunshine and fresh air.     

This is a quick, easy throw together blackberry cobbler recipe that I got from Ree Drummond at Food Network.  This takes less than 5 minutes to throw together and can bake while everyone is sitting around eating dinner.  My entire family really enjoyed this last night.

Blackberry Cobbler

1/2 stick melted butter (I use non-dairy butter)
1 1/4 c. + 2 tbsp. sugar
1 c. self rising flour
1 c. almond milk (or regular milk)
2 c. fresh or frozen blackberries

Preheat the oven to 350 degrees F. Grease a 3-quart baking dish with butter.  In a medium bowl, whisk 1 cup sugar with the flour and milk. Whisk in the melted butter.  Rinse the blackberries and pat them dry. Pour the batter into the baking dish. Sprinkle the blackberries evenly over the top of the batter. Sprinkle 1/4 cup sugar over the blackberries. Bake until golden brown and bubbly, about 1 hour. When 10 minutes of the cooking time remains, sprinkle the remaining 2 tablespoons sugar over the top. Serve with ice cream.  Our new favorite is a coconut milk vanilla ice cream.  Yummy!

Recipe shared with:

Chef in Training 

Thursday, February 2, 2012

Triple Chocolate Black Bean Brownies


Very recently we have started my 4 year old daughter on a no-dairy diet because she seems to complain that her stomach hurts quite frequently. Since I'm dairy intolerant it makes sense the first thing that needs to go is dairy to see if we can fix her poor little belly. Everything she eats now she asks me if it is ok and if it has dairy in it. She's very concerned for a 4 year old. I wanted to show her a few recipes that we could make together this week that were tasty, chocolatey and dairy-free. I actually haven't made this recipe in a few years and after tasting it don't know why. These were absolutely delicious. You'd never ever guess that they had black beans in them. My husband doesn't really like very dark chocolate and felt the chocolate was too bittersweet for him. Unfortunately I have 2 options for chocolate here. I can buy either Ghirardelli Intense Dark Chocolate that is 72% cocoa or Lindt Smooth Dark Chocolate which is 70% cocoa, both which contain absolutely no dairy. So if you make this recipe you may want to use a semi-sweet chocolate instead if you don't like the bitter-sweetness of dark chocolate. My daughter and son both absolutely loved these brownies. She was so happy that she could still have the occasional dessert and it not make her belly hurt. I certainly wouldn't say these are healthy brownies since they do have a whopping 1/2 cup of oil in them but that I love the addition of the extra protein and fiber the beans contribute instead of using regular white flour. I actually swapped out all-purpose flour for my whole wheat flour but feel free to use what you like. I also opted to leave out the instant coffee because we usually have our dessert after dinner and I worry about that little bit of caffeine that my kids will get from eating them.

Triple Chocolate Black Bean Brownies


3/4 c. canned black beans (well rinsed)
1/2 c. canola oil
2 large eggs
1/4 c. unsweetened cocoa powder
2/3 c. sugar
1 tsp. instant coffee (*optional)
1 tsp. vanilla extract
4 oz. dark chocolate, melted
4 oz. dark chocolate chunks
1/3 c. whole wheat pastry flour
1/2 tsp. baking powder
1/2 tsp. salt


Preheat the oven to 350 degrees F. Line a 9x9 square baking pan with parchment paper and spray with non-stick spray.  In your food processor puree the beans with the oil.  Add in the eggs one at a time and pulse a few times each time.  Then add in your sugar, cocoa, coffee (if using) and vanilla.  Allow to blend well.  Make sure to pop the lid off and scrape down the sides periodically so you don't end up with any unwanted black bean chunks.  Melt 4 oz. of the dark chocolate and pour into the food processor while pulsing.  In a separate bowl whisk together the flour, salt and baking powder.  Add the flour mixture into the food processor and pulse a few more times until fully incorporated.  Then add in the chocolate chunks and pulse no more than 2-3 times to incorporate without breaking them up too much.  So defintely don't turn the food processor on completely just give a pulse or two.  Or simply stir in by hand.  Pour the batter into your sprayed pan.  Bake until edges are cooked and ever so slightly pulling away from the side of the pan and the center looks shiny, not gooey.  This should be roughly 20 minutes.  Allow to cool completely before eating.  

Monday, January 23, 2012

Chewy Gluten Free Chocolate Chip Cookies

So I don't think I've yet to be disappointment with an Alton Brown recipe.  I saw this gluten-free cookie recipe a while ago on Food Network but couldn't find tapioca flour in my one grocery store here on base and they certainly don't have it in one of the Japanese stores so I had to order it from Amazon and wait patiently until it arrived.  Seems slightly silly since you only use about 2 tbsp. of it, but I'm not use to not using flour in recipes so wasn't sure how important that one ingredient really was.  I did make some adjustments to the original recipe to make it not just gluten-free but dairy-free as well.  I substitute non-hydrogenated shortening for the butter, used soy milk for the whole milk, and used a 72% good quality dark chocolate that contained no dairy.  Most good quality dark chocolates don't contain dairy you just have to read the labels.  I wasn't sure what to expect with these cookies.  I certainly didn't expect to eat the entire pan of them myself, but I did, oops.   

Chewy Chocolate Chip Cookies (Gluten-Free & Dairy-Free)

8 ounces non-hydrogenated shortening
11 ounces brown rice flour (or white rice flour), approximately 2 cups
1 1/4 ounces cornstarch, approximately 1/4 cup
1/2-ounce tapioca flour, approximately 2 tablespoons
1 teaspoon xanthan gum
1 teaspoon kosher salt
1 teaspoon baking soda
2 ounces sugar, approximately 1/4 cup
10 ounces light brown sugar, approximately 1 1/4 cups
1 whole egg
1 egg yolk
2 tablespoons soy milk
1 1/2 teaspoons vanilla extract
12 ounces 72% dark chocolate chips

Preheat the oven to 375 degrees F.  In a medium bowl, sift together the rice flour, cornstarch, tapioca flour, xantham gum, salt and baking soda. Set aside.  Cream the shortening and sugar together in your standing mixer.  Add the whole egg, egg yolk, milk and vanilla extract and mix until well combined. Slowly incorporate the flour mixture until thoroughly combined. Add the chocolate chips and stir to combine.  Chill the dough in the refrigerator until firm, approximately 1 hour. Shape the dough into 2-ounce balls and place on parchment-lined baking sheets, 6 cookies per sheet. Bake for 8-10 minutes, rotating the pans after 5 minutes for even baking. Remove from the oven and cool the cookies on the pans for 2 minutes. Move the cookies to a wire rack and cool completely. Store cooked cookies in an airtight container.

Saturday, January 21, 2012

Peanut Butter Oatmeal Cookies

This recipe is great.  I found it on Ann Arbor and decided the next time I got a sweet craving and was willing to cave I was going to make these.  This is a gluten-free and dairy-free recipe which is why I chose it.  You always think that if something is dairy-free or gluten-free then it probably doesn't taste very good.  Definitely not true.  This cookie really delivers, it gives you everything you want in a peanut butter cookie and you don't miss the butter or flour.   


Peanut Butter Oatmeal Cookies (Gluten-Free/Dairy-Free)

3/4 cup creamy peanut butter
4 tbsp. non-hydrogenated shortening
1/2 cup white granulated sugar
1/4 cup brown sugar
1 teaspoon vanilla
1 egg
1 teaspoon baking soda
1 cup gluten-free rolled oats*
1/2 cup pecans or walnuts finally chopped (optional)
1/4 teaspoon of salt
extra white sugar for coating

If you are truly sensitive to gluten make sure your oats are gluten-free because most oats are processed in facilities that process gluten products so just check your label.  I use regular quacker rolled oats because I just opt to limit my gluten. 

Preheat the oven to 400 degrees. Line a large baking sheet with parchment paper and set aside.
In a food processor grind the oats to a powder. In another bowl, mix together the ground oats, baking soda and salt. Set aside.  In a medium-sized bowl using an electric hand mixer, or in a stand mixer, cream the peanut butter, shortening, white sugar, brown sugar and vanilla until well combined, about 2-3 minutes. Add the egg and mix for another minute. Add the dry ingredients to the peanut butter mixture until combined.  Use a tablespoon to scoop the dough and make balls. Roll the balls in a little white sugar and place onto the baking sheet. Use a fork to press down on the balls in a criss-cross pattern.

Bake until the cookies until they are golden brown and the surfaces have cracked, about 7-9 minutes. Allow cookies to cool on the pan completely before moving to avoid breaking.

Makes about 24 cookies.

You can also freeze these cookies.  Just roll into a ball and roll in sugar like you are going to bake them.  Even go ahead with the criss-cross pattern.  Place them on the baking sheet in the freezer for about 30 minutes.  Then place them in a freeze safe container or bag and freeze until ready to use.  

Monday, January 2, 2012

Oatiest Oatmeal Cookies


So this is the third time I've typed this now and it won't stop being in all caps and I'm about to just give up.  I was watching Food Network a day or two ago and Alton Brown was doing a show on oats, all oats.  Yum!  I love oats!  This is just one of the many recipes on there that I was excited to try.  This recipe requires absolutely no flour, just oats.  I also omitted the butter and substituted non-hydrogenated shortening to eliminate the dairy as well.  I actually made this recipe twice.  The first time I didn't have or use a scale and tried to just convert the weighed measurements to cups.  Totally didn't work. I had a big blob of a mess, a tasty mess, but not a cookie.  So I went out and bought a scale.  I needed one anyways especially since I just got the Good Eats 3 cookbook for Christmas and most of Alton Brown's recipes are done by weight.  This cookie was amazing.  I loved it, my kids loved it, and I didn't even feel bad indulging a bit since it was gluten-free and dairy-free.  This is a very thin, crispy cookie, but totally worth it.  Yum!   


This recipe was adapted from Alton Brown's Good eats.


16 ounces old-fashioned rolled oats
1 teaspoon baking powder
1 teaspoon ground cinnamon
Pinch kosher salt
10 ounces non-hydrogenated shortening
6 ounces dark brown sugar
3 1/2 ounces granulated sugar
1 large egg
1 teaspoon vanilla extract
4 ounces raisins, optional (soaked in hot water for 10 minutes to rehydrate)

Preheat the oven to 375 degrees F.  Start soaking your raisins in hot water to allow them to rehydrate while you make the cookies.  Spread oats into a single layer on a half sheet pan. Bake until lightly toasted, about 20 minutes . Cool the oats for 2 to 3 minutes on the pan.  Grind 8 ounces of toasted oats in a food processor until the consistency of whole wheat flour, about 3 minutes. Add the baking powder, cinnamon and salt to the food processor and pulse 2 to 3 times to combine. Set aside.  Combine the shortening and sugars in the bowl of a stand mixer and mix on medium speed using the paddle attachment until light in color, about 3 minutes. Stop once to scrape down the sides of the bowl. Reduce the mixer speed to the lowest speed and add the egg and vanilla extract. Mix to combine. Slowly add the flour mixture until just combined. Stop once to scrape down the sides of the bowl. Add the remaining toasted oats and the (drained) raisins. Stir to combine.  Scoop the dough with a 1 1/2-ounce disher onto parchment-lined half sheet pans, leaving 2 inches between each mound. Bake until the cookies begin to brown around the edges, 12 to14 minutes. Rotate the pan halfway through cooking. Cool on the pans for 2 minutes, and then move to a cooling rack to cool completely.

Tuesday, December 6, 2011

Eggnog Pumpkin Milkshake

It seems like it has been forever since I've posted on here.  I wish I could say time flies when you are having fun but truth is I've just been sick.  Everyone in my house seems to be being hit with one cold after the next.  Guess this whole winter in Japan thing is gonna be brutal for our entire family.  I've had a horrid cough for almost a month now.  I've been sick and then diagnosed with pneumonia.  Now that I'm starting to feel just a tiny bit better my husband and son are both sick again so I'm preparing to be hit with that cold soon too.  I'm even on a prescription cough medicine but nothing works.  So I can't really get into the kitchen to do anything because being warm in the kitchen puts me into an uncontrollable coughing fit.  Oh well I suppose I can try to look at the bright side and how much stronger our immune systems will all be next year!  

I actually made this milkshake before Thanksgiving and am just getting around to posting it.  It was amazing.  It was like pumpkin pie in a glass.  This was definitely a nice treat.  The recipe calls for raw egg yolks.  You don't have to use these they just give it an extra incredible richness.  I used them but I didn't give any to my kids because of the raw egg.  Of course, they wanted chocolate milkshakes anyways not pumpkin.  I'd definitely make this again, a nice holiday drink.    This recipe was adapted from Aaron McCargo, Jr. of Food Network

Eggnog Pumpkin Milkshake  
 
3 egg yolks
1 cup sugar
1 cup heavy cream
1 cup milk
1 (15-ounce) can pumpkin puree
2 tablespoons vanilla extract
1 1/2 teaspoons ground cinnamon
1 teaspoon pumpkin pie spice
4 cups vanilla ice cream
Whipped cream, for garnish
Graham Crackers, for garnish


Add all the milk shake ingredients except the ice cream into a blender and blend until smooth. Add the ice cream and blend until smooth and thick. Pour into glasses, garnish with whipped cream, pumpkin pie spice, and a bit of graham cracker crumbs.


Monday, November 21, 2011

Pumpkin Jelly Roll

Ok so I think my family is getting sick of pumpkin desserts at this point.  Not so good for me since we haven't even made it to Thanksgiving yet!  How can they be sick of it?!  Pumpkin is sooo good!  I've never made a pumpkin roll before or any roll cake before so decided to give it a try. I was surprised that it turned out really well and I didn't even have difficulty with cracking as many people do.  This is a really basic recipe directly from Libby's Pumpkin website.   

Pumpkin Jelly Roll

1/4 cup powdered sugar (to sprinkle on towel)
3/4 cup all-purpose flour
1/2 teaspoon baking powder
1/2 teaspoon baking soda
1/2 teaspoon ground cinnamon
1/2 teaspoon ground cloves
1/4 teaspoon salt
3 large eggs
1 cup granulated sugar
2/3 cup pumpkin puree
1 cup walnuts, chopped (optional)

Filling:  
1 pkg. (8 oz.) cream cheese, at room temperature
1 cup powdered sugar, sifted
6 tablespoons butter or margarine, softened
1 teaspoon vanilla extract
Powdered sugar (optional for decoration) 
 
Preheat oven to 375° F. Grease 15 x 10-inch jelly-roll pan; line with wax paper. Grease and flour paper. Sprinkle a thin, cotton kitchen towel with powdered sugar. Combine flour, baking powder, baking soda, cinnamon, cloves and salt in small bowl. Beat eggs and granulated sugar in large mixer bowl until thick. Beat in pumpkin. Stir in flour mixture. Spread evenly into prepared pan. Sprinkle with nuts.  Bake for 13 to 15 minutes or until top of cake springs back when touched. (If using a dark-colored pan, begin checking for doneness at 11 minutes.) Immediately loosen and turn cake onto prepared towel. Carefully peel off paper. Roll up cake and towel together, starting with narrow end. Cool on wire rack.

Filling:

Beat cream cheese, 1 cup powdered sugar, butter and vanilla extract in small mixer bowl until smooth. Carefully unroll cake. Spread cream cheese mixture over cake. Reroll cake. Wrap in plastic wrap and refrigerate at least one hour. Sprinkle with powdered sugar before serving, if desired.

Sunday, November 20, 2011

Mini Eclairs

I promised my husband pastry cream and boy did I deliver.  I'm not sure why I don't make this more often.  There are few things in life more pleasurable than pastry cream.  It is just the most creamy, delicious, amazing tasting thing out there.  I decided I didn't want big long eclairs like they are traditionally so instead I made mini eclairs, filled them with pastry cream and dipped them in a chocolate ganache.  These were heaven in every single little delicious bite.   I'd suggest making the pastry cream first as it has to sit for 4 or so hours in the refrigerator before using.  

Mini Eclairs

Dough:

2 large eggs + 1 egg white
5 tbsp. unsalted butter
2 tbsp. whole milk
6 tbsp. water
2 tbsp. sugar
1/4 tsp. salt
1/2 c. all-purpose flour

Pastry Cream, recipe below
Chocolate Sauce, recipe below

Preheat oven to 400 degrees.  Add butter, milk, water, sugar and salt in a saucepan over medium heat until butter is melted and sugar is dissolved.  Then using a wooden spoon add in the flour.  Keep stirring allowing the dough to start to come together and then stir an additional 2-3 minutes to allow it to dry out slightly while cooking.  Turn the burner off and continue to stir another 1-2 minutes.  Pour hot dough into a bowl and all to cool slightly before adding your eggs.  When the dough is still warm but cool enough to handle and not scramble your eggs, add the eggs one at a time stirring and combining completely before adding the next egg.  It will take a bit of elbow grease to get it fully incorporated.  After the 2nd egg and egg white is added to the dough it should be a nice thick consistency but no so thick you can't shake it off your wooden spoon.  Scoop dough into a pastry bag and use either a straight tip or cut the corner of a ziplock bag.  Make sure to use parchment paper (or spray with non-stick spray) and pipe out 1-inch balls onto the parchment paper leaving plenty of space between each as they will puff up while cooking.  Dip your finger in water (to prevent sticking) and pat down the tip on the top of each ball, if necessary.  Bake 12 minutes then reduce temperature to 375 degrees and allow to cook another 10-15 minutes or until golden brown.  They should be light airy and dry inside.  If you take out too soon they will collapse and won't stay puffed up.  Allow to cool completely.  Use a straight tip again in a pastry bag and fill with the pastry cream.  Poke hole with the tip and fill the eclair up with as much or as little filling as you'd like.  Then dip the tops in the ganache and then allow the chocolate to set.  Enjoy!     

Chocolate Ganache:


8 ounces good semisweet chocolate chips
1/2 cup heavy cream
Cook the chocolate chips and heavy cream in the top of a double boiler over simmering water until smooth and warm, stirring occasionally. 

Pastry Cream:

2 c. half-and-half
1/2 c. sugar
pinch of salt
5 large egg yolks
3 tbsp. cornstarch
4 tbsp. (1/2 stick) unsallted butter
1 1/2 tsp. vanilla extract


Heat half-and-half, 6 tbsp. sugar and salt in saucepan over medium heat until simmering and sugar is dissolved.  Meanwhile whisk the egg yolks in a medium bowl until combined.  Whisk in the remaining 2 tbsp. sugar until thick and creamy about 30 seconds.  Whisk in the cornstarch until pale yellow, about 30 seconds. Gradually whisk the half-and-half mixture into the yolk mixture to temper.  Be VERY slow so you don't scramble your eggs.  Return the entire mixture ot the saucepan scraping bowl with spatula and return to a simmer over medium heat whisking constantly until a few bubbles burst on the surface and the mixture is thickened and glossy, like a pudding.  Off the heat whisk in the butter and vanilla.  Strain through a fine mesh sieve over a bowl.  Press plastic wrap directly on the surface to prevent a skin from forming and refrigerate until set and cold which is at least 4 hours and up to 2 days.    

Post shared with:

Sweet As Sugar Cookies
At Home with Haley  
Debbie Debbie Doos 
 Something Swanky
Well Seasoned Life 

Sunday, November 13, 2011

Chocolate Chunk Blondies

 Another recipe from Ina Garten.  These basically are the same thing as regular chocolate chip cookies just made into bars and called blondies, but hey they are delicious anyways!  I make cookies way to often in my house.  It is just so quick and easy to throw together chocolate chip cookie dough.  So by doing something simple like changing it into bars everyone in my house feels they are eating something a bit different than our usual cookie.  


 Chocolate Chunk Blondies

1/2 pound (2 sticks) unsalted butter, at room temperature
1 cup light brown sugar, lightly packed
1/2 cup granulated sugar
2 teaspoons pure vanilla extract
2 extra-large eggs, at room temperature
2 cups all-purpose flour
1 teaspoon baking soda
1/2 teaspoon kosher salt
1 1/2 cups chopped walnuts (optional)
1 1/4 pounds semisweet chocolate chunks (or chips)

Preheat the oven to 350 degrees. Grease and flour an 8 x 12 x 2 inch baking pan.

In the bowl of an electric mixer fitted with the paddle attachment, cream the butter, brown sugar, and granulated sugar on high speed for 3 minutes, until light and fluffy. With the mixer on low, add the vanilla, then the eggs, one at a time, and mix well, scraping down the bowl. In a small bowl, sift together the flour, baking soda and salt and with the mixer still on low, slowly add flour mixture to the butter mixture. Fold the walnuts and chocolate chunks in with a rubber spatula.

Spread the batter into the prepared pan and smooth the top. Bake for 20-25 minutes. Don't overbake! A toothpick may not come out completely clean. Cool completely in the pan and then cut into bars.

Wednesday, November 9, 2011

Profiteroles

This is the first time I've ever made this.  I saw it recently on Food Network and thought I'd give it a shot.  It was really really good.  My husband wanted pastry cream instead of ice cream in them so that is gonna be my next project sometime this week.  I was surprised at how easy this was to make.  It all came together pretty quick and I always enjoy doing new things, especially with a piping bag.  Makes me feel all pastry chef like.  The hot fudge sauce recipe is from Anne Burrell and the Profiteroles recipe is from one of my favorite cookbooks Baking Illustrated.

Profiteroles

2 large eggs + 1 egg white
5 tbsp. unsalted butter
2 tbsp. whole milk
6 tbsp. water
2 tbsp. sugar
1/4 tsp. salt
1/2 c. all-purpose flour
Ice Cream of your choice.
Chocolate Sauce, recipe below

Preheat oven to 400 degrees.  Add butter, milk, water, sugar and salt in a saucepan over medium heat until butter is melted and sugar is dissolved.  Then using a wooden spoon add in the flour.  Keep stirring allowing the dough to start to come together and then stir an additional 2-3 minutes to allow it to dry out slightly while cooking.  Turn the burner off and continue to stir another 1-2 minutes.  Pour hot dough into a bowl and all to cool slightly before adding your eggs.  When the dough is still warm but cool enough to handle and not scramble your eggs, add the eggs one at a time stirring and combining completely before adding the next egg.  It will take a bit of elbow grease to get it fully incorporated.  After the 2nd egg and egg white is added to the dough it should be a nice thick consistency but no so thick you can't shake it off your wooden spoon.  Scoop dough into a pastry bag and use either a straight tip or cut the corner of a ziplock bag.  Make sure to use parchment paper (or spray with non-stick spray) and pipe out 1-inch balls onto the parchment paper leaving plenty of space between each as they will puff up while cooking.  Dip your finger in water (to prevent sticking) and pat down the tip on the top of each ball, if necessary.  Bake 12 minutes then reduce temperature to 375 degrees and allow to cook another 10-15 minutes or until golden brown.  They should be light airy and dry inside.  If you take out too soon they will collapse and won't stay puffed up.  Allow to cool completely.  Slice lengthwise and add a small scoop of ice cream in the center and top with chocolate sauce.   

Chocolate Sauce:

4 ounces dark chocolate
1/4 cup heavy cream
2 tablespoons butter
1 tablespoon corn syrup

Bring a saucepan with 1-inch of water to a boil. Put the chocolate in a metal or heatproof glass mixing bowl and place on top of the saucepan with boiling water. Pay careful attention that the mixing bowl does not touch the surface of the boiling water. Add the rest of the ingredients and stir until the chocolate has melted and everything is combined. This is a pretty quick process, once the chocolate has melted remove it from the double boiler set up. Spoon over the filled profiteroles. This is best when served warm!