Saturday, December 31, 2011

Banana Nut Oatmeal

Oh what a wonderful 2011 we had.  After three weeks of Christmas Break for my daughter and three weeks of leave for my husband we managed to do just about everything I wanted to do.  We made it to Tokyo for the first time and saw Tokyo Tower, The Imperial Palace, Ropppongi, we went to Kawasaki and hit the biggest mall I've ever seen and Peyton got to ice skate for her first time ever, we went to new parks, aquariums, zoos and oh my did we go out to eat one too many times.  We had an amazing Christmas.  I've never seen my kids so happy.  I bought my husband a new grill for Christmas and he was just like a little kid too.  He started rummaging through the house looking for anything and everything he could to grill just to try out his new grill.  None of that has anything to do with the recipe either.  I just felt like sharing.  Granted we had a 7.0 earthquake here in Japan today that scared my kids terribly and left me a bit freaked out.  I hope 2012 is just as amazing of a year for us as 2011 was.  So, here is one of my favorite breakfasts.  I love oatmeal and there is just so much you can do with it and it is so darn good for you!
View from Tokyo Tower.

Banana Nut Oatmeal

1/2 c. old fashioned Rolled Oats
1 c. Almond Milk (vanilla or unsweetened)
1 large banana
1 tbsp. slivered almonds
1/2 tsp. vanilla extract (or almond extract)
1/4 tsp. ground cinnamon
1 tsp. Pure Maple Syrup 

Bring the almond milk to a boil and add in your oats.  Cook according to the package instructions, about 5-8 minutes, stirring occasionally.  Turn on low and add in your cinnamon and vanilla extract and stir.  Then add an entire banana.  I usually just break it up into a few pieces.  Then I use a potato masher and mash the banana into the oatmeal.  The riper the banana the better as you won't need any extra sweetener if your banana is at its ripest.  Then top with a few slices of banana if you want and some slivered almonds.  Add a teaspoon or two of maple syrup on the top for extra sweetness if needed. 


Walnut Whole Wheat Pancakes w/ Blueberry Syrup

Just like everyone else that ate one too many desserts in the previous year, I'm starting the new year out right with some healthy new recipes and meals for my family.  My daughter wants nothing but pancakes, french toast and waffles for breakfast every single day.  Most mornings we have 1 hour for me to get everyone up, dressed, fed, showered and out the door before her bus picks her up.  That doesn't leave an abundance of time for me to cook breakfast.  So I decided to try to make my normal pancakes a bit healthier.  That was a success, she said they were the best pancakes she had ever had.  My next step was trying to get her to use blueberry syrup in place of our normal 100% Pure Maple Syrup.  That was not a success.  Everyone else loved the syrup but as you can see from the picture below she wasn't going to budge.  New pancakes, fine.  New syrup, no thank you.  My son on the other hand loved the pancakes and the blueberry syrup.  I also made these pancakes dairy free as I'm trying to get away from using dairy in my house.  I actually liked these pancakes so much I ate a few more than I should have!  My daughter hates nuts so the trick to get that extra added protein and the benefits of nuts was to grind them and use them as part of the dry ingredients.  Gave the pancakes awesome texture.   These also freeze really well so on school days you can just pop them in the microwave for about 30 seconds each side and you are all set.   

Walnut Whole Wheat Pancakes

1 1/2 c. whole wheat pastry flour 
1/4 c. ground walnuts (or other nut of your choice)
3 tbsp. sugar (honey or agave nectar can be substituted) 
1 tsp. baking powder
1/2 tsp. baking soda
1/2 tsp. salt
2 large eggs, separated & room temp.
2 tbsp. canola oil
1 1/3 cups almond milk (original or vanilla)
1/2 tsp. vanilla extract 

1 1/2 tbsp. lemon juice
Pinch cream of tartar 


*Blueberry Syrup, recipe below

Add about a cup of walnuts to your food processor and pulse until finely ground.  Then add flour, ground nuts, sugar, baking powder, baking soda and salt to a large mixing bowl. Add egg yolks, oil, almond milk, lemon juice and vanilla into a separate bowl and whisk to combine.  Allow to sit for about 5 minutes giving the chance for the lemon juice to work its magic (lemon juice and almond milk together take the place of buttermilk). Place the room temperature egg yolks into your mixer fitted with a whisk and add the pinch of cream of tartar.  Beat on a medium to medium high until nice relatively stiff peaks form.  Add wet almond milk mixture into the flour mixture and whisk until just barely combined.  You don't want to whisk until all the lumps are out.  Once the egg whites are at relatively stiff peaks fold them into the pancake batter until just combined making sure to be easy enough to not deflate the egg whites.  Allow the batter to sit for a minimum of 20 minutes before pouring onto a hot skillet or griddle.  I like to use a 1/4 c. measuring cup to scoop out my pancakes and pour onto a griddle to make sure they are all relatively the same size.  Spray with a bit of non-stick cooking spray first.  Once you see bubbles on the top of the batter they are ready to flip.  

Blueberry Syrup
1/2 bag of frozen blueberries
zest and juice from 1 lemon
2 tbsp. maple syrup

Bring frozen blueberries, maple syrup and lemon juice and zest to a simmer on medium heat in a saucepan.  Allow to cook until thick and slightly reduced, about 8-10 minutes.  If the sauce is too thick, add a splash of water.  If it is too thin you can cook longer to reduce or always cheat just a bit by adding a teaspoon or two of cornstarch with a bit of extra lemon juice.  

* A trick to get quick room temperature eggs.  Take your eggs out of the fridge and place in a large cup or bowl and fill with hot water from the tap.  Allow to sit in the water for 5-10 minutes.  Then dry off the eggs and use. 

Tuesday, December 27, 2011

Japanese Ginger Dressing

I absolutely LOVE this dressing.  I'm not big on making salads because I hate store bought dressings and I get tired and bored with simple vinaigrette that I make at home.  Recently while staying a few nights in Tokyo we ate at a Japanese restaurant and they had this amazing ginger dressing.  Reminded me of the ginger dressing you get at the Japanese steakhouses back in the states that I use to visit quite often.  So I started searching the internet for a recipe so I could make this at home.  I definitely will be eating more salad now that I found this recipe.  This recipe makes enough for about 3 large salads with more dressing than necessary on them.  If you go light on your dressing it'll go further.  I also ate a salmon salad with one of them and this was absolutely amazing on top of my salmon as well.   This recipe was adapted from All Recipes.  I made only a few slight modifications to it such as using tomato paste instead of ketchup, as I hate ketchup in recipes and I omitted the water and added a bit less oil.  
Japanese Ginger Dressing 
1/2 cup minced onion
1/3 cup peanut oil
1/3 cup rice wine vinegar
2 tablespoons minced fresh ginger root
2 tablespoons minced celery
2 tablespoons tomato paste
4 teaspoons soy sauce
3 teaspoons white sugar
2 teaspoons lemon juice
1/2 teaspoon minced garlic
1/2 teaspoon salt
1/4 teaspoon ground black pepper
In a blender, combine the minced onion, peanut oil, rice vinegar, water, ginger, celery, tomato paste, soy sauce, sugar, lemon juice, garlic, salt and pepper. Blend on high speed for about 30 seconds or until all of the ingredients are well-pureed.  This tastes good freshly pureed but even better after sitting in the fridge an hour or two. 

Sunday, December 18, 2011

Peanut Butter Blossoms

Something that I like to do around the holidays every year is make Peanut Butter Blossoms.  Everyone has had these delicious cookies at one time or another.  The recipe is even on the back of the Hershey Kisses bags this time of year.  For my daughter's school Christmas party I wanted to make 4-6 different types of Christmas cookies to bring to the potluck.  A fun way to make these cookies a little more Christmas like is to roll them in green and red sugar before baking like my picture below.  The cookie platter is one of my dishes at the potluck I was just to rushed and things a bit too hectic for me to take pictures beforehand and afterwards it was definitely too late because they were all gone.  
Peanut Butter Blossoms 

48 Hershey Kisses Chocolates
1/2 cup shortening
3/4 cup Creamy Peanut Butter
1/2 cup granulated sugar
1/2 cup packed light brown sugar
1 egg
2 tablespoons milk
1 teaspoon vanilla extract
1-1/4 cups all-purpose flour
1 teaspoon baking soda
1/2 teaspoon salt
Granulated sugar (can use red or green sugar)
 
Heat oven to 375°F. Remove wrappers from chocolates. Beat shortening and peanut butter in large bowl until well blended. Add 1/2 cup granulated sugar and brown sugar; beat until fluffy. Add egg, milk and vanilla; beat well. Stir together flour, baking soda and salt; gradually beat into peanut butter mixture.  Shape dough into 1-inch balls. Roll in granulated sugar; place on ungreased cookie sheet.  Bake 7 to 9 minutes or until lightly browned. Immediately press a chocolate into center of each cookie; cookie will crack around edges. Remove from cookie sheet to wire rack. Cool completely.  About 4 dozen cookies.
Slept the entire way home from her party.
My little reindeer.

Turkey Brine

When it comes to Thanksgiving people either usually brine or butter.  I like to do both.  A few years ago I heard about brining and decided to try it.  I've been doing it every year since.  It makes a huge difference in the juiciness of your turkey.  I like to play around with my brine recipes year to year and see how they turn out.  This one is the one I did this year.   I'm not sure why it has taken me so long to get this up here either.  I gave this one out to friends and family this year too and had no complaints.  This is an Anne Burrell recipe from Food Network.  

Brine:

7 quarts water
1 quart apple cider
3/4 cup kosher salt
1/3 cup granulated sugar
1 large onion, diced
1 large or 2 small carrots, diced
3 ribs celery, diced
1 head garlic, cut in 1/2 equatorially
1/2 bunch fresh rosemary
1/2 bunch fresh sage
1/2 bunch of thyme
6 bay leaves
1 (12 to 14 pound) turkey

Herb crust:

1 bunch fresh rosemary, leaves finely chopped
1 bunch fresh sage, leaves finely chopped
1 bunch of thyme, finely chopped
3 sticks butter, room temperature
Kosher salt

To brine the turkey:  Combine 4 cups of water and salt and sugar in a saucepan and heat until all sugar and salt is completely dissolved.  The pour into your big brining bucket with all remaining ingredients and stir to combine.  Add the turkey and let it brine in the refrigerator for 48 hours.

To prepare the turkey for cooking: Remove the turkey from the brine about 6-10 hours before you are going to cook it.  I usually take it out first thing in the morning around 7am, but if you are going to cook it early you can do this the night before.  pat it thoroughly dry with paper towels. Combine the rosemary, sage, thyme and (room temperature) butter for the herb crust in a small bowl. Season, to taste, with kosher salt. Work the butter under the skin of the turkey and massage it into the breasts and the legs. Massage the butter on the outside of the skin as well. Tie the legs together over the breast so they will protect it during cooking and help keep it moist and juicy.

Arrange your turkey on top of the vegetables you plan on roasting with it and refrigerate overnight UNCOVERED! Yes, that's right, uncovered. This will help the skin dry out and become really brown and crispy. Make sure that there is no raw food near the turkey in the refrigerator. After refrigerating overnight, the turkey is ready to go in the oven.

Preheat the oven to 450 degrees F.  Put 3 cups chicken stock in the bottom of the roasting pan. Roast the turkey in the preheated oven until the skin gets really nice and brown, about 40 minutes. Lower the oven heat to 350 degrees F for the remainder of the cooking time. Baste the turkey every 30 minutes or so and add more stock to the roasting pan, if needed. Cook about 17 minutes per pound. Once it gets to the proper color, tent the turkey with aluminum foil to prevent it from getting too dark.
Remove the turkey from the oven when an instant-read thermometer inserted in the thickest part of the turkey registers 160 degrees F. Make sure that the thermometer is not touching a bone when doing the reading. When the turkey has reached the proper temperature, remove it from the roasting pan to a cutting board and let it rest for at least 30 minutes. Cover loosely with aluminum foil.

Strain all the veggies over a bowl to separate them from the stock/mixture. Discard the veggies. Skim off the fat and add it to the roasting pan. This is the fat for the roux. Put the roasting pan over 2 burners and over a low heat and whisk in the flour. Cook until the mixture looks like wet sand, about 4 to 5 minutes. Slowly whisk in the remaining 1 cup chicken stock (or white wine if preferred). Cook until the mixture has thickened and reached a gravy consistency. Taste and adjust the seasoning. Pour into a serving pitcher or bowl.

Tuesday, December 6, 2011

Chocolate Butterscotch Fudge - Crazy Cooking Challenge

This one was a really hard one for me.  My mom makes the best fudge in the world.  The only person's fudge that can rival hers is mine.  I absolutely HATE, yes hate is a strong word, but I hate fudge made in the microwave or made with sweetened condensed milk.  To me that just isn't what I'm looking for in a fudge.  I don't like the taste or texture.  I think once you go the cooking fudge route you never go back.  I like fudge that requires cooking and a candy thermometer.  Of course, my candy thermometer is broken so I just make it without one because I've made fudge one too many times.  So I searched high and low to find a fudge recipe that didn't include sweetened condensed milk and required cooking.  I wanted to do something different but every recipe I found and tried I was displeased with.  I mean I can't post about a fudge that I took one bite of and tossed it because it wasn't worth the calories for me to eat it.  Then I found it.  I have to say this is probably one of the most wonderful, delicious, amazing recipes I've ever made.  I'm absolutely head over heels in love with this fudge and am terrified I'm going to eat the entire pan all by myself! 

This is chocolate fudge with a butterscotch fudge layer.  I love the combination of these two flavors.  This fudge is so rich and decadent and everything a fudge should be.  It takes a bit of work making two fudges, in two pans, at the same time but so worth it.  You really only need to do both at the same time if you plan on swirling the fudge flavors together which I originally thought I was going to do but changed my mind at the last minute.  So if you are going to layer them you can make them separately if you want since fudge is something you really need to keep an eye on and stir a lot so it doesn't burn.  I had a whisk in both hands for this.  
Photobucket

I found this recipe on Year on the Grill.  He originally was making a black and white fudge but the color of the white fudge wasn't what he wanted so he switched gears and turned it into a butterscotch fudge instead.  What a brilliant idea!  I did make a few tiny little changes to it.  Boy am I glad I found this recipe! 
  

Chocolate Fudge

1 1/2 cup Granulated Sugar
3/4 cup Heavy Cream
3 tbsp. Cocoa
1 1/2 tbsp. White Corn Syrup
1/2 tsp. Vanilla
4 tbsp. Butter
1/2 cup Dark Chocolate Chips


Combine sugar, syrup, cocoa, 2 tbsp. of butter and cream.  Boil to the soft ball stage (234 degrees F to 238 degrees F on a candy thermometer).  Add in the chocolate chips and whisk until melted.  Drop in the remaining 2 tbsp. of butter and vanilla extract, but do not stir.  Allow to cool 10 minutes first.  Then beat until the chocolate slightly loses that glossy look.  Then you will need to immediately pour into your prepared (greased) dish because it will start to set.

Butterscotch Fudge

1 1/2 cup Granulated Sugar
3/4 cup Heavy Cream
1 1/2 tbsp. White Corn Syrup
1/2 tsp.Vanilla
4 tbsp. Butter
3/4 cup Butterscotch Chips

Combine sugar, syrup, 2 tbsp. of butter and cream. Boil to the soft ball stage (234 degrees F to 238 degrees F on a candy thermometer). Add in the butterscotch chips and whisk until completely melted.  Drop in the remaining 2 tbsp. of butter and vanilla extract but do not stir.  Allow to cool 10 minutes first.  Then beat until creamy and not as glossy.  Then immediately pour over the top of the chocolate fudge because it will start to set pretty quickly.  At this point you can swirl the two together with a butter knife by doing figure 8's or allow to set layered. 


VOTE # 38 if you like my recipe!

Olive Garden Breadsticks

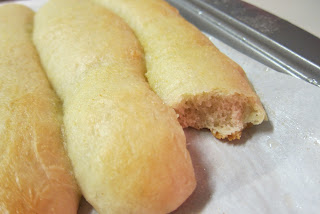
I love Olive Garden's bread sticks.  I mean, who doesn't!  They are awesome.  I get to see Olive Garden commercials on the TV here all the time and it makes me so sad that I can't just run out and have lunch there anytime I want like I use to.  Bread sticks and salad, yum!  So I saw this copy cat recipe on Moms Crazy Cooking and instantly decided that I was making these for dinner.  Granted this was a couple weeks ago but it is my little boy's nap time so I'm trying to catch up on my posts.  These bread sticks were awesome.  No one even cared about the spaghetti I made with them.  Everyone just wanted more bread sticks.  My husband was in love with these and said they are not only just like the Olive Garden's bread sticks but they were better and he wants them more often.  They actually made my poor spaghetti boring because they were so good!   

Olive Garden Bread Sticks

2 tbsp. granulated sugar
2 tsp. active dry yeast
1 cup; plus 1 tbsp warm water (105-115 degrees)
3 cups bread flour
1-1/2 tsp. salt
1/4 cup butter, softened


Topping:
2 tbsp. butter, melted
1/2 tsp. garlic salt

Dissolve the sugar and yeast in the warm water in a small bowl or measuring cup and let the mixture sit for about 5 minutes, or until it becomes foamy on top. Combine flour and salt in a large bowl. Use the paddle attachment on your stand mixer to mix in the softened butter to the flour. Switch to your dough hook and add your foamy yeast mixture to the flour. Combine ingredients and then knead for 10 minutes. Transfer dough to a lightly greased bowl and cover, let rise for 1 to 1 1/2 hours, it will double in size. Once doubled, measure out portions to roll into bread sticks. The easiest way to roll is between your palms but you can also roll on the counter or a cutting board.  Place dough on a parchment lined baking sheet, or non-stick  sprayed baking sheet. Once all dough is rolled, cover baking sheet and let rise for another hour to 1 1/2 hours. Until the dough doubles in size again. Preheat oven to 400 degrees. Bake the bread sticks  for 12-14 minutes till golden brown. Remove from oven and add the garlic salt to the melted butter and then brush it over the bread sticks.

Makes 12-13 bread sticks.

Eggnog Pumpkin Milkshake

It seems like it has been forever since I've posted on here.  I wish I could say time flies when you are having fun but truth is I've just been sick.  Everyone in my house seems to be being hit with one cold after the next.  Guess this whole winter in Japan thing is gonna be brutal for our entire family.  I've had a horrid cough for almost a month now.  I've been sick and then diagnosed with pneumonia.  Now that I'm starting to feel just a tiny bit better my husband and son are both sick again so I'm preparing to be hit with that cold soon too.  I'm even on a prescription cough medicine but nothing works.  So I can't really get into the kitchen to do anything because being warm in the kitchen puts me into an uncontrollable coughing fit.  Oh well I suppose I can try to look at the bright side and how much stronger our immune systems will all be next year!  

I actually made this milkshake before Thanksgiving and am just getting around to posting it.  It was amazing.  It was like pumpkin pie in a glass.  This was definitely a nice treat.  The recipe calls for raw egg yolks.  You don't have to use these they just give it an extra incredible richness.  I used them but I didn't give any to my kids because of the raw egg.  Of course, they wanted chocolate milkshakes anyways not pumpkin.  I'd definitely make this again, a nice holiday drink.    This recipe was adapted from Aaron McCargo, Jr. of Food Network

Eggnog Pumpkin Milkshake  
 
3 egg yolks
1 cup sugar
1 cup heavy cream
1 cup milk
1 (15-ounce) can pumpkin puree
2 tablespoons vanilla extract
1 1/2 teaspoons ground cinnamon
1 teaspoon pumpkin pie spice
4 cups vanilla ice cream
Whipped cream, for garnish
Graham Crackers, for garnish


Add all the milk shake ingredients except the ice cream into a blender and blend until smooth. Add the ice cream and blend until smooth and thick. Pour into glasses, garnish with whipped cream, pumpkin pie spice, and a bit of graham cracker crumbs.